The purpose of this document is to assist campus users with troubleshooting items that arise in AM.
Helpful Tidbits
Schedule Changes
The retro trigger functionality for schedule changes is currently turned off. This means that if an employee’s schedule is changed after an absence has already been submitted or approved, the system will not automatically recalculate the absence and a manual adjustment is required.
As a result, if an employee’s summer schedule is changed retroactively, any previously submitted or approved absences must be adjusted manually.
Example: If employee is on an 8hr M-F schedule and they submit a Sick Absence for a full day (8 hours) on 8/1/2025 but on 8/12/2025 the employees schedule is change to 6hr M-F effective 7/1/2025, then a manual adjustment would need to be done to account for the sick already submitted/approved.
Absence Request
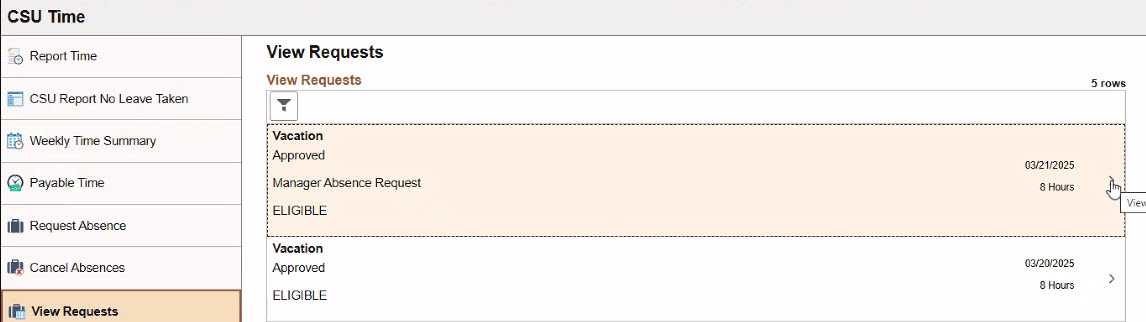
Employee receives an email that the absence submitted has been approved, but they did not submit
In AM, approvers can submit a request on behalf of an employee. When that request is fully approved the employee will receive an email notification. If the employee reports that they did not submit the request and it should not have been approved, begin by identifying who submitted the request. This can be done by having the employee provide a screenshot of the approval in question by going to their Employee Self Service > CSU Time Tile > View Request
- If the request shows "Manager Absence Request" then their manager submitted the request on their behalf and confirming with the manager would be next steps.
- If the request does not show "Manager Absence Request", this indicates the employee submitted the absence.
Employee cannot locate an absence that has been submitted.
If any employee cannot find an absence that has been submitted, the appropriate administrator should complete the following steps:
- Navigate to the Absence Event page
- Navigation: Menu > Global Payroll & Absence Mgmt > Payee Data > Maintain Absences > Absence Event
- Enter the employees ID in the search section.
- Once the results appear, look for the date(s) the employee claims to have submitted the absence for.
- If the request cannot be located, the employee should submit again.
- If the request can be located, but has a has a blank workflow status, then select “-“ (minus) on the right-hand side of the identified row to delete and have the employee submit the absence again.
- If the request can be located and the workflow status is is populated, meet with the employee.
Employee is experiencing forecasting issues.
This may happen for different reasons, depending on the specific error message. Refer to the error section of this document to identify the appropriate next steps.
Faculty cannot enter absence for a Saturday.
In CHRS everything is tied to a schedule. If an employee's schedule does not show that they are scheduled to work on a Saturday, they will not be able to report an absence for that day. To assist with situations like this, campuses can choose from the following options:
- Complete an adjustment.
- Assign the employee an appropriate work schedule that includes that day.
- Modify the employees existing schedule.
- Request that the employee select a different day that falls within their schedule.
Absence Approval
Employee has a blank workflow status on the Absence Event page
There are occasions when an employee "submits" an absence request, that an error will occur resulting the request to have a blank workflow status on the Absence Event page. When this occurs, the appropriate administrator should select “-“ (minus) on the right-hand side of the identified row to delete.
Campuses do not need to monitor for absences having a blank workflow status on the Absence Event page. However, the query CSU_AM_ABS_WORKFLOW_ISSUES is available for campuses that would like to.
Approver is unable to see the requested absence
This issue can arise for several reasons. Before submitting a Optimize Case, please confirm the following:
Secuirty
Confirm that the approver has
- AM Secuirty Roles
- Accurate Row Level Security
- Is the "Report To" for the employee who submitted the absence
Multi Campus
Identify if the approver has other campus association using CSU ID Search. As Absence Management is using the PeopleSoft delivered AWE functionality which does not account for an employee or managers having multiple OPRID. The delivered functionality only looks for the OPRID with the lowest alpha numeric number which is causing the absence request to route to the managers account that has the OPRID with the lowest alpha numeric number.
If the approver does have other campus association, it is possible that the transaction routed incorrectly. Run the CSU_AM_ROUTE_WRONG_EMAIL query to confirm if the approver appears. If the approver appears, the workflow administrator can reroute the request to the correct OPRID.
A former inactive employee's absence request is awaiting approval
This issue can arise due to their multi campus association. As Absence Management is using the PeopleSoft delivered AWE functionality which does not account for an employee or managers having multiple OPRID. The delivered functionality only looks for the OPRID with the lowest alpha numeric number which is causing the absence request to route to the managers account that has the OPRID with the lowest alpha numeric number.
If the approver does have other campus association, it is possible that the transaction routed incorrectly. Run the CSU_AM_ROUTE_WRONG_EMAIL query to confirm if the approver appears. If the approver appears, the workflow administrator can reroute the request to the correct OPRID.
Approver cannot locate canceled absence.
An approver is only required to approve a canceled absence if it was originally approved before being canceled. Check the absence to determine if it had prior approval. If not, this would explain why the approver cannot locate it.
Balance Details
State Service Sum incorrect for Multi-Campus Employee
Employees that work at multiple campuses, should have their State Service Sum appear calculated correctly. However in some cases, conversion is unable to successfully calculate the value. When this occurs, the conversion team will provide an audit indicating the multi-campus employees impacted to the converted campuses. The campuses already in production, will have to refer to the employees State Service Sum for the previous month, to determine if the incorrect amount is due to new campuses implementing.
The steps for campus to resolve, is to:
- Identify what the correct value is for the employee at the recently converted campus
- Identify the other campuses that employee is associated with using CSU ID Search
- Contact the other campus the employee is associated with and discuss the value that the employee should have with that campus
- Work together to make the adjustment for the employee
Excess +/- is not showing accurately for an employee
Various scenarios and circumstances can lead to inaccurate display of Excess +/- for an employee. Before submitting a Optimize Case, please review the following to determine the appropriate next steps.
Conversion
During conversion, an employee’s accruals will be carried forward. Often, it may appear that the employee’s balances—especially Excess +/-—are incorrect. However, this may not be the case, depending on factors such as when the employee was hired, whether they are shared, if a schedule modification occurred, or if transaction changes took place in Job Data. When reviewing the employee’s balances, those factors must be considered, along with the month your campus was converted and the calendar currently open in CHRS. For campuses recently converted into CHRS, balances should be reviewed once the calendar has been finalized in CHRS. After review, if the balance still appears inaccurate, a Optimize Case should be submitted.
Employees Effective Dates
Employees who are hired, reassigned, or terminated mid-month may occasionally have their balances—especially Excess +/-—appear incorrect. This may be due to an AM calculation failing to initiate or a trigger not being created when the transaction was entered. Often, in these scenarios, a Optimize Case is required once it has been determined that there is no issue with the employee's schedule, the campus is not recently converted, and no trigger can be found.
Primary and Alternate Schedules
Start by reviewing the employee’s assigned schedule, paying particular attention to the following:
- Effective Day/Date - There is a common misconception that the date and day a schedule begins has no impact. However, this is inaccurate, as an incorrectly set schedule can cause employee balances—particularly Excess +/-—to appear incorrect. A schedule intended to begin on a specific day of the week must have a start date that aligns with that day. For example, if the schedule runs from Tuesday through Thursday, it must be set to begin on a Tuesday. Verify if the effective day/date is accurate based on when the schedule is intended to begin. If there is a conflict, the schedule will need to be adjusted, and a Optimize Case will not be required.
- Duplicate Schedule- Often, when updating, creating, or assigning a schedule to an employee, it’s overlooked that one may already be set up. Review the employee’s schedule to ensure there are no multiple schedules within the same or overlapping date range, and that there are no conflicts between the Primary and Alternate Schedules. If conflicts are found, one or more schedules may need to be removed, and a Optimize Case will not be required.
- Mid-Month Modification- An employee's schedule should generally be modified at the beginning of a new month or pay period. Although, in reality, this is not always possible and can occasionally lead to employee balances—especially Excess +/-—appearing incorrect. If this is the case, it may be necessary to determine whether the original schedule was modified or if a new schedule was created. Depending on the situation, further research may be required, as a retro trigger could be initiated by the change.
Retro Triggers
Identifying whether a retro trigger has been initiated or remains unprocessed can help clarify the cause of a balance discrepancy. This can be done by running a private query using the GP_RTO_TRGR - Retro Triggers table. If a retro trigger has been initiated and left unprocessed, a Optimize Case will need to be submitted requesting for the retro trigger to be canceled.
Personal Holiday balance is not showing accurately for an employee
In CHRS, one Personal Holiday is accrued annually at the employee level, regardless of the number of jobs held. Regardless of the number of active jobs held at the same or different campus, the employee will still only receive one Personal Holiday at the beginning of each year.
When the Personal Holiday balance appears inaccurate or an employee seems to have not accrued their Personal Holiday, it could be due to various circumstances. Before submitting a Optimize Case, verify if any of the following circumstances apply.
- Conversion: During conversion, an employee’s accruals will be carried forward. Often, it may appear that the employee’s balances are incorrect. However, this may not be the case, depending on factors such as when the employee was hired, whether they are shared, if a retro trigger was created and if the employee already used Personal Holiday prior to conversion. When reviewing the employee’s balances, those factors must be considered, along with the month your campus was converted and the calendar currently open in CHRS. For campuses recently converted into CHRS, balances should be reviewed once the calendar has been finalized in CHRS. After review, if the balance still appears inaccurate, a Optimize Case should be submitted.
- Usage: Verify that the employee has not already used their Personal Holiday balance for the year. The Personal Holiday balance resets at the beginning of each year and is maintained at the employee level. If they have, a Optimize Case will not be necessary.
- Multi Campus: Identify if the employee has other campus association using CSU ID Search. If the employee is currently or recently active with another campus, it is possible that they used the Personal Holiday under that other campus. You may need to contact the other campus directly to confirm the usage. Depending on their response, a Optimize Case may not be necessary.
An approved absence for June is not calculating per summer schedule change on Multi Reports
If the employee’s schedule changes after the approval of an absence, the system does not recalculate the duration in the Reported Absence Report (Multi Reports). The absence duration displayed on the Reported Absence Report (Multi Reports) is based on the employee’s data at the time the request is submitted.
For prior periods an adjustment is required. However for current periods the recalc process will update the balances accordingly on the Results By Calendar Group page.
Seeing a conversion row in Balance Inquiry
Campuses already in production will see a conversion row each time a new campus is implemented. This is required to bring over that campus’s balances into the system. For newly implemented campuses, the conversion row will display a balance because it reflects what the employee had at the time of the new campus’s conversion.

Unable to locate adjustment made
Before submitting a ticket, review the Results by Calendar Group for the month in which the adjustment was completed. An adjustment will appear under the calendar month in which it was made, rather than the month to which the adjustment applies. Only if the adjustment cannot be located should a Optimize Case be opened.
Example: If an adjustment is made for an employee on October 10, 2025, for an absence that occurred on April 15, 2025, the adjustment will appear under the October calendar for the employee, not the April calendar.
Adjustment appearing under the wrong month
the adjustment was completed. An adjustment will appear under the calendar month in which it was made, rather than the month to which the adjustment applies. Only if the adjustment continues to appear under the incorrect month should a Optimize Case be submitted.
Example: If an adjustment is made for an employee on October 10, 2025, for an absence that occurred on April 15, 2025, the adjustment will appear under the October calendar for the employee, not the April calendar.
Delegation
A delegation request was submitted and the Proxy can no longer accept the request
Job Aid: Administer AM Delegation Approval
Unfortunately there is a known Oracle Bug with Delegations, that will remain in CHRS until all campuses are live and PUM updates can occur.
Campus:
- Navigate to the Administer Delegation page
- Navigation: Menu > Workforce Administration > Self Service Transactions > Approvals and Delegation > Administer Delegation
- In the Selection Criteria, enter the Proxys EMPL ID
- Press "search"
- In the results, toggle to the Request Details tab.
- Review the Delegation Status
- If status appears as "active" then additional troubleshooting will be required by the campus as the delegation request has been already approved.
- If status appears as "Inactive" then submit a an Optimize Case to CHRS Operations to approve the delegation request on behalf of the Proxy.
CHRS Operations:
- Navigate to the Administer Delegation page
- Navigation: Menu > Workforce Administration > Self Service Transactions > Approvals and Delegation > Administer Delegation
- In the Selection Criteria, enter the Proxys EMPL ID
- Press "search"
- In the results, toggle to the Request Details tab.
- Confirm the delegation request has a Delegation Status of "Inactive".
- Navigate to Monitor Approvals page
- Navigate: Menu > Enterprise Components > Approvals > Approvals > Monitor Approvals
- In the Search Criteria, select "Delegation" in the Approval Process field and enter the EMPL ID of the employee requesting the delegation in the Requester field.
- Press "search"
- Use the Search result filters to further refine the search scope and select the delegation approval request that is pending approval.
- A detailed screen will appear titled "Monitor Approvals"
- Review the information and press "Approve"
- Return to the Administer Delegation page
- Navigation: Menu > Workforce Administration > Self Service Transactions > Approvals and Delegation > Administer Delegation
- In the Selection Criteria, enter the Proxys EMPL ID
- Press "search"
- Review the results to confirm the delegation request has a Delegation Status of "Active"
Delegation Not Working for Approver on Leave of Absence
When an approver is in a Leave of Absence (LOA) status in Job Data, the delegation feature will not function for their direct reports. Oracle-delivered workflow treats employees on LOA as inactive approvers and does not route approval requests to delegates or proxies. Instead, approval transactions are automatically routed to the approver’s reports-to manager. As a result, delegation will not work while the approver remains in LOA status. The recommended approach is to temporarily update the reports-to structure to ensure approvals are routed correctly rather than relying on delegation.
No transaction options are available when setting up a delegation request for an approver
There are a few reason why some or all options are unavailable when setting up a new delegation request.
- The employee that you chose is missing the AM and/or TL approver roles.
- The employee already has an active delegation in place with dates that overlap with the new request.
- The employee has multiple user profiles (from working at multiple campuses).
- In this case, the system is trying to resolve the user profile with the lowest number User ID that matches the Empl ID of the approver. If the chosen user profile doesn't have the appropriate roles, the expected transaction options will not display on the Add Delegation Request page.
- Submit an Optimize Case to CHRS Operations requesting assistance.
Notifications
Absence Request/Approval Emails Sent to Incorrect Employee Email
This issue can arise for several reasons. Before submitting an Optimize Case, confirm the following:
Accurate Email
On occasions the BUSN email, located in the User Profile, can be updated through integration between CS and CHRS. Unless the campus is continuously monitoring BUSN email updates through a private query, campuses have no knowledge of the update. Therefore, it is important to make sure the email in the User Profile is accurate for the employee receiving the email.
If the email BUSN email, located in the User Profile, is incorrect work with the correct campus administrator to make the correction in CS.
Navigation: Menu > PeopleTools > Security > User Profiles
Absence Request Sent to Incorrect Approver Email
This issue can arise for several reasons. Before submitting a Optimize Case, please confirm the following:
Accurate Email
On occasions the BUSN email, located in the User Profile, can be updated through integration between CS and CHRS. Unless the campus is continuously monitoring BUSN email updates through a private query, campuses have no knowledge of the update. Therefore, it is important to make sure the email in the User Profile is accurate for the employee receiving the email.
If the email BUSN email, located in the User Profile, is incorrect work with the correct campus administrator to make the correction in CS.
Navigation: Menu > PeopleTools > Security > User Profiles
Accurate Reports To
In AM, the approval workflow is based on the 'Reports To' structure, with only one individual designated as the approver. If this structure is incorrect, it may result in communications being misrouted. To resolve this, start by reviewing the employees who should report to the approver that is not receiving the expected email communications. Verify that the position numbers have the correct 'Reports To' assignment and check for any recent changes to their position that may have affected the reporting structure.
If the 'Reports To' structure has been updated, collaborate with the appropriate campus administrator to review the changes and determine if any additional modifications are needed. A case is not required in this instance.
Multi Campus
Identify if the employee has other campus association using CSU ID Search. Run the CSU_AM_ROUTE_WRONG_EMAIL query to confirm if the wrong approver appears. If the approver appears, the workflow administrator can reroute the request to the correct OPRID.
Error Messages
Calendar Finalizing - Payee Messages
Each month, CHRS Operations will email a listserv of campus users to notify them that an error has been identified which will prevent the calendar from being finalized. It is the responsibility of each campus to review and resolve the error. If the issue remains unresolved three days prior to calendar finalization, a High Priority Optimize Case will be created and assigned to CHRS App Dev. Refer to the error messages below to guide resolution efforts.
The payee is not associated with absence management prior to %1
Message Set and Number: 17005,470
Message Severity: Error
Meaning: In order to process the request the system needs to determine the payees Paygroup as of the absence event end date. According to the data in the job table the payee is not associated with any global payroll or absence management Paygroup prior to this date. Either enter a later date and try again, or review and update the job information for this payee as appropriate.
Next Steps: Before submitting a High Priority Optimize Case related to calendar finalization, take a moment to confirm the accuracy of the employee’s Job Data and review any absences submitted for the month.
Eligibility Group %1 could not be found. Payment resolution is terminated.
Message Set and Number: 17005,941
Message Severity: Error
Meaning: Eligibility Group could not be found. Segment is set in error without being processing Eligibility Groups are setup at the Pay Group level.
Next Steps: Before submitting a High Priority Optimize Case related to calendar finalization, take a moment to confirm the accuracy of the employee’s Job Data and review any absences submitted for the month.
Shift ID Definition: %1 could not be found as of date: %2
Message Set and Number: 17005,553
Message Severity: Error
Meaning: The Shift ID definition was not found. The Absence Take or Proration element was not resolved. Processing Proration and Absence Take elements often require work schedule information to be resolved.
Next Steps: Before submitting a High Priority Optimize Case related to calendar finalization, take a moment to verify the employee’s schedule for multiple schedules set up within the same or similar date range, or any conflicts between the Primary and Alternate Schedules. If there are conflicts, one or more schedules may need to be removed, and a Optimize Case will not be necessary.
Eligibility Group %1 is not active as of %2. Payment resolution is terminated.
Message Set and Number: 17005,942
Message Severity: Error
Meaning: Eligibility Group is not active within the time period of the segment. Segment is set in error without being processed Eligibility Groups are setup at the Pay Group level.
Next Steps: Before submitting a High Priority Optimize Case related to calendar finalization, take a moment to confirm the accuracy of the employee’s Job Data and review any absences submitted for the month.
Element Group %1 could not be found. Payment resolution is terminated
Message Set and Number: 17005,943
Message Severity: Error
Meaning: Element Group could not be found. Segment is set in error without being processing Element Groups are linked to an Eligibility Group. Eligibility Groups are setup at the Pay Group level.
Next Steps: Before submitting a High Priority Optimize Case related to calendar finalization, take a moment to confirm the accuracy of the employee’s Job Data and review any absences submitted for the month.
No data found for Employee %1 in table(s): %2 %3 %4
Message Set and Number: 17005,951
Message Severity: Error
Meaning: The program could not find any information for the payee in the table(s) indicated by the message.
Next Steps: Before submitting a High Priority Optimize Case related to calendar finalization, take a moment to verify the accuracy of the employee’s Job Data, review any absences submitted for the month, and confirm the employee’s schedule.
Return value of partial formula %1 (Parent %2 - Effective Date %4) is not in valid range.
Message Set and Number: 17005,943
Message Severity: Error
Meaning: The return value of the partial formula assigned to a deduction is not in the valid range. The value must be greater than zero and less or equal to the current net without the calculated deduction. An invalid return value will lead to incorrect results when performing net pay validation.
Next Steps: Submit a High Priority Optimize Case. noting that the request pertains to calendar finalization.
Net pay validation control formula missing or invalid with active net pay validation by priority.
Message Set and Number: 17005,954
Message Severity: Error
Meaning: When Net Pay Validation by Priority is selected for a sub-process section a control formula is required for correct processing of priority order. Valid values are 0 (process in processing order), 1 (calculate), 2 (skip element) and 3 (perform net pay validation). Please either deselect Net Pay Validation by Priority flag from sub-process section or define a valid control formula on the country set up page for the country of the current pay run.
Next Steps: Submit a High Priority Optimize Case, noting that the request pertains to calendar finalization.
No data found for %1 %2 in the %3 table %4
Message Set and Number: 17005,956
Message Severity: Error
Meaning: The program could not find any information for the payee/job in the table indicated (effective as of date indicated).
Next Steps: Before submitting a High Priority Optimize Case related to calendar finalization, take a moment to verify the accuracy of the employee’s Job Data, review any absences submitted for the month, and confirm the employee’s schedule.
Retro cannot be processed for Payee %1 due to conflicting Retro Processing definitions.
Message Set and Number: 17005,147
Message Severity: Warning
Meaning: Multiple Retro Events exist with contradictory Retro Process Definitions Ids. To process retro, the Ids must be equal.
Next Steps: Before submitting a High Priority Optimize Case related to calendar finalization, take a moment to check for any retro triggers. This can be done by running a private query using the GP_RTO_TRGR - Retro Triggers table. If a retro trigger has been initiated and left unprocessed, an Optimize Case will need to be submitted requesting for the retro trigger to be canceled.
The payee has been suspended from Calendar Group %1
Message Set and Number: 17005,317
Message Severity: Warning
Meaning: The payee was active in the other Calendar Group when your run was initiated.
Next Steps: A High Priority Optimize Case ticket will be required, noting that assistance is required from CHRS Operations. As CHRS Operations must temporarily suspended from the Calendar Group identified. As soon as this calendar group is either Canceled or Finalized, the employee will be automatically re-activated in the other run upon executing the Calculate phase.
Work Schedule: %1 does not cover the entire processing period %2 through %3
Message Set and Number: 17005,551
Message Severity: Warning
Meaning: No rows or not enough rows were found in the work schedule table to cover the entire processing period from the (earliest process date -1 day) to the (latest process date +1 day). The adjusted dates are required to resolve the day before and day after system elements related to work schedule.
Next Steps: Before submitting a High Priority Optimize Case related to calendar finalization, take a moment to verify the employee’s schedule for multiple schedules set up within the same or similar date range, or any conflicts between the Primary and Alternate Schedules. If there are conflicts, one or more schedules may need to be removed, and a Optimize Case will not be necessary.
Work Day Definition with Schedule ID: %1 for Day number %2 could not be found as of date: %3
Message Set and Number: 17005,552
Message Severity: Warning
Meaning: The Work Day Definition was not found and an Absence Take or Proration element could not be resolved . Processing of Proration and Absence Take elements often requires work schedule information to be resolved.
Next Steps: Before submitting a High Priority Optimize Case related to calendar finalization, take a moment to verify the employee’s schedule for multiple schedules set up within the same or similar date range, or any conflicts between the Primary and Alternate Schedules. If there are conflicts, one or more schedules may need to be removed, and a Optimize Case will not be necessary.
The payee is already open in Calendar Group %1
Message Set and Number: 17005,840
Message Severity: Warning
Meaning: A payee can only be open in one Calendar Group for a Country at any one point in time. The payee has been suspended from the current Calendar Group.
Next Steps: Submit a High Priority Optimize Case, noting that the request pertains to calendar finalization.
No job entry found with matching payment keys while resolving element %1 as of %2.
Message Set and Number: 17005,907
Message Severity: Warning
Meaning: While searching to determine FTE code, the process was not able to locate a JOB data row matching the payment keys of the segment being processed. The rate code element was not resolved.
Next Steps: Before submitting a High Priority Optimize Case related to calendar finalization, take a moment to confirm the accuracy of the employee’s Job Data and review any absences submitted for the month.
No data found for %1 %2 in the %3 table %4
Message Set and Number: 17005, 952
Message Severity: Warning
Meaning: The program could not find any information for the payee/job in the table indicated (effective as of date indicated). A possible cause could be a retro change in hire date or Paygroup change.
Next Steps: Take a moment to confirm that the employee’s Job Data is correct and no Retro Triggers are preventing processing. Before submitting a High Priority Optimize Case related to calendar finalization, take a moment to check the accuracy of the employee’s Job Data and review for any retro triggers. This can be done by running a private query using the GP_RTO_TRGR - Retro Triggers table. If a retro trigger has been initiated and left unprocessed, a Optimize Case will need to be submitted requesting for the retro trigger to be canceled.
Element Rule Definition Not Found. Record: %1, Element: %2, As of Date: %3, Parent Element: %4
Message Set and Number: 17005, 1
Message Severity: Warning
Meaning: No Element Rule Definition was found for the element indicated (as of the date indicated). Please review the element and the parent element definition.
The message is an indication that the element is referred to within a period of time before the element was defined (or the element has never been defined). The most likely reason would be that an element has been removed or its EFFDT has been changed after it has already been referenced within a process list section or from another element. The parent element is provided when applicable to give more direction as to where this element is being referenced and where to trouble-shoot or correct the setup. Record refers to the database table where data was sought, but not found.
The following is a map of table names to element types:
GP_ABS_ENTL = Absence Entitlements,
GP_ABS_TAKE=Absence Take,
GP_ARRAY = Arrays,
GP_ARRAY_FLD = Array return columns,
GP_ARRAY_KEY = array look-up columns,
GP_BRACKET = Brackets,
GP_DATE=Dates,
GP_COUNT = Counts,
GP_PRORATION = Proration,
GP_ROUND_RULE=Rounding,
GP_ERN_DED=Earnings or Deductions,
GP_FORMULA=Formula,
GP_GCTL=Generation Control,
GP_HIST_RULE=Historical Rule,
GP_RATE_CODE=Rate Codes,
GP_FC_TBL=Fictitious Calculations,
GP_VARIABLE=Variables,
GP_WA_ARRAY=Writable Array
Next Steps: Submit a High Priority Optimize Case, noting that the request pertains to calendar finalization.
Invalid PIN number %1. Valid range is 1 thru %2. Expand GPCUPINT if needed.
Message Set and Number: 17005, 2
Message Severity: Error
Meaning: The PINT-DATA array of GPCUPINT.CBL contains an entry for every loaded element, entries are indexed and positioned based on PIN-number. Expand the array to fit elements with higher PIN numbers if necessary
The database has reached more than 300,000 elements (less certain number series reserved for PeopleSoft delivered system data and elements). The remedy is to expand the COBOL array defined in the GPCUPINT.CBL file. The number - as indicated by the message - may be different/higher if the file has previously been modified. See also message 3 for further information
Next Steps: Submit a High Priority Optimize Case, noting that the request pertains to calendar finalization.
Internal array overflow occurred for array %1 defined in copybook %2 with a max array count of %3
Message Set and Number: 17005, 3
Message Severity: Error
Meaning: Data volume exceeds the number of rows allocated for the COBOL array identified. Modify the COBOL storage definition to expand the size of the array.
To limit database access (and gain performance) a lot of data is stored in fixed size COBOL memory. Should there be more rows of data in the database than can fit in this array there is no way to dynamically expand the area nor resolve elements that are dependent on data not loaded. The message indicates the name of the array that has run out of room and in what COBOL file it is defined.
To rectify the problem the size of the array must be expanded and the number in the -COUNT or -LIMIT related to the array be updated accordingly. [By nature the memory requirement will vary from customer to customer. We have tried to define them to support everyone without making them so large that it impacts performance too adversely. Thus we must encourage that these be customized until we see the same array become a problem at multiple installations.]
Next Steps: Submit a High Priority Optimize Case, noting that the request pertains to calendar finalization.
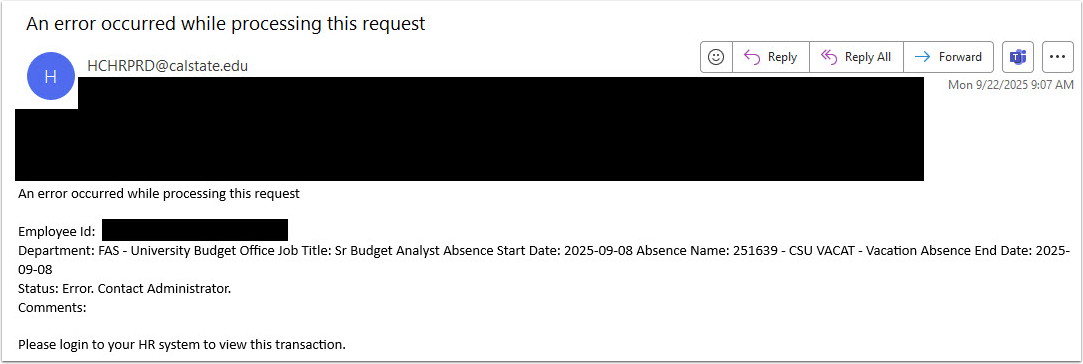
Email Message
An Error Occurred While Processing This Request
Meaning: An error occurred while processing the request.
Next Steps: The email notification may be triggered for several reasons. When you receive this email, please follow these steps:
- Review the details provided in the notification.
- Confirm whether the employee is associated with your campus.
- If they are, then review:
- Check whether a submission has already been made. If so, this likely explains the email notification.
- Verify the employee’s eligibility to submit the requested absence.
- Review the employee’s work schedule to confirm that the requested dates align with scheduled workdays.
- Ensure the employee has an active “Reports To” in Job Data. If not, coordinate with the appropriate campus resource to update Job Data
If the cause of the notification cannot be identified, submit a Optimize Case for further assistance.
Absence Request awaiting your approval
Meaning: An absence has been requested, but no approver could be identified.
Next Steps: When you receive this email, please follow these steps:
- Review the details provided in the notification.
- Confirm whether the employee is associated with your campus.
- If they are, confirm that the employee has an active “Reports To” in Job Data. If not, work with the appropriate campus resource to update Job Data. If the “Reports To” is active, submit a Optimize Case for further review.
Employee Self Service Errors
These errors may appear when employees submit absence requests. Use the messages below to assist in resolving the issue with the employee.
An Absence already exists with the same Start and/or End dates. Please modify your Start and/or End dates
Meaning: This message normally appears because an absence already exists for those date(s).
Next Steps: Verify the absence does exists by having the appropriate administrator navigate to the Absence Event Page. If an absence already exists for the same date(s), inform the employee. If changes are needed, the employee must cancel and resubmit the absence.
Job Aids:
The Start and End Dates of your absence are overlapping with an existing absence. Please modify your Start and/or End Date.
Meaning: This message typically appears when the absence being submitted overlaps with one that has already been submitted.
Next Steps: Have the appropriate administrator review any existing absences submitted by the employee that fall within the same date range by navigating to the Absence Event Page. Collaborate with the employee to adjust either the existing absence or the new one they are trying to submit to ensure dates do not overlap.
Forecasting Message Error
Errors that occur during the Forecasting process often generate a message explaining why the error occurred. Refer to the error messages below to guide resolution efforts.
Work Schedule: .75 M-F 6 HRS does not cover the entire processing period 2025-02-28 through 2025-04-01
Meaning: This message may indicate an issue with the employee's assigned schedule.
Next Steps: Review the employee’s schedule to confirm there are no multiple schedules set up within the same or similar date range, or any conflicts between the Primary and Alternate Schedules. If there are conflicts, one or more schedules may need to be removed, and a Optimize Case will not be necessary.
Balance Forecast As Of Date falls within an Absence Begin and End Date. Please select an As Of Date Before or After the Absence Event Begin/End Date.
Meaning: The Forecast Balance As of Date overlaps with an existing absence event. This creates an issue, as two events cannot occur for the same absence on the same day.
Next Steps: Determine what absences the employee has already submitted. If there is an overlap with an existing absence event, either the existing or new request may need to be adjusted, and a Optimize Case will not be required.
SQL Error During Absence Forecasting. This type of error is not likely to happen unless there is a conflict in the database. Please contact your system or database administrator.
Meaning: For each call to PTPSQLRT, there is the potential that an SQL-ERROR could occur for either the Select or the Fetch. This is set in the ZZ000-SQL-ERROR section. This requires system administrator intervention.
Next Steps: Submit a Optimize Case, noting that who the employee is and what was being entered.
No Absence Events exist to forecast for this employee. This error is not likely to happen in self service because at least one event will exist when forecasting from absence self service.
Meaning: There are no absence events for this employee. This is indicated if no rows are returned for a SELECT against GP_ABS_EVENT looking for the min (bgn_dt) and max (end_dt) (for non voided events only). This could happen if forecasting and only voided events exist. It wouldn’t happen if you forecast after creating or modifying an event.
Next Steps: Determine what absences the employee has already submitted, modified, or canceled. If there is an overlap with an existing absence event, either the existing or new request may need to be adjusted, and a Optimize Case will not be required.
No Calendars were found for the template. Using the Calendar Group ID component, please add calendars to your template for the period in which you want to forecast.
Meaning: The calendar detail corresponding to the calendars on the template are missing or the dates are missing. This is indicated by a SELECT on a join of GP_CALENDAR, GP_CAL_DTL and GP_CAL_PRD for the CAL_RUN_ID from the run control. This is a data setup issue that requires system administrator intervention.
Next Steps: CHRS Operations typically configures the AM Calendars around June and July each year. During this period, employees may be temporarily unable to submit absence requests for the upcoming calendar year. If an employee is experiencing issues submitting an absence, review the month(s) they are attempting to submit for and consider whether the AM Calendars are currently being updated. If so, the employee may need to wait until the configuration is complete. Submit a Optimize Case, noting that who the employee is and what was being entered if it is for a current month.
Error - You do not have enough balance to cover this Absence Request. Please review your balance using the View Forecast Details link.
Meaning: This generally means that the employee does not have enough balance to cover this request.
Next Steps: Before submitting a Optimize Case, please review the following:
- Review the Submission: Absence requests for POS or STU employees must include the number of hours. Confirm with the employee whether they selected “Partial Days” and entered the correct hours. If not, have them do so before exploring other potential causes. If the employee is MST or ACD, the error may be due to other factors.
- Check Existing Absence Requests: Verify whether the employee has already submitted, modified, or canceled any absences for the current or upcoming months. Based on this information, the employee may need to update their existing submissions accordingly.
- Review Employee Schedule: Examine the employee's schedule for any overlapping or conflicting schedules within the same or similar date ranges, particularly between Primary and Alternate Schedules. If conflicts exist, resolving them by removing the incorrect schedule(s) may eliminate the need for a Optimize Case.
- Check for Retro Triggers: Determine if a retro trigger is preventing the employee from submitting an absence. Events such as changes to Job Data, schedules, or other updates can affect the employee’s balance. You can check for this by running the CSU_AM_RETROTRIGGERCHECK, which references the GP_RTO_TRGR – Retro Triggers table.
If a retro trigger has been generated but not processed, a Optimize Case must be submitted to request cancellation of the trigger. - AM Calendar Configuration Timing: CHRS Operations typically configures the AM Calendars around June and July each year. During this period, employees may be temporarily unable to submit absence requests for the upcoming calendar year.
If an employee is experiencing issues submitting an absence, review the month(s) they are attempting to submit for and consider whether the AM Calendars are currently being updated. If so, the employee may need to wait until the configuration is complete.
End of Article