
Background
The operational requirements of CHRS Recruiting (PageUp, a 3rd party vendor) rely heavily on an integration with PeopleSoft Human Capital Management. PageUp utilizes a four-level structure throughout the recruiting process to assist with automatically assigning groups and for reporting. The structure is descending from Campus to Division, then College/Program, and Department.
The creation of an Organizational Hierarchy Tree is a vital component for the integration between PeopleSoft and PageUp. It is used to define the organization’s structure as it relates to positions to be recruited for. It is also used to assign access, and to report on recruitment activities within the organization.
The purpose of this paper is specific to the creation of Organizational Hierarchy Trees for reporting and integration. The process outlined in this paper describes how PeopleSoft Tree Manager is used to create and maintain hierarchical structures. It is imperative that the tree is built consistently using the four-level structure in order for it to work properly with PageUp. Each campus will build a tree that groups departments by function using the following structure:
Level 1 – Campus
Level 2 – Division
Level 3 – College/Program (e.g., College = School of Ed, Program = IT)
Level 4 – Department
Although the driving force of Organizational Hierarchy Trees is PageUp, CHRS will use this structure for reporting within PeopleSoft as well as other systems such as SumTotal and Data Warehouse.
Issue
Currently, PeopleSoft contains Department and Security trees which, at most campuses, are maintained by Finance and IT respectively. This new Tree is organizational in nature and is designed specifically for CHRS Recruiting purposes.
As a result, each campus must designate a person in Human Resources that is responsible for the maintenance of the CHRS Tree. As part of this decision, campuses must consider not only who will initially build the tree but who will continue to maintain it and incorporate all organizational changes going forward. The Organizational Hierarchy Tree must be accurately maintained as this will affect reporting and functionality within PageUp.
Analysis
Several methods were considered as options for providing the required hierarchical data for PageUp; the current CSU modification for PPT Department setup, a new modification, or the delivered tree manager functionality. After several discussions, a proof of concept for the tree manager method was prepared and reviewed.
It was determined that using hierarchy trees for PageUp is the most efficient and consistent way to capture the organizational structure. Summarization rules are located in a centralized place, rule definitions are set up once and applied throughout the PageUp system. Different reporting may refer to the same organizational chart and all these objects can utilize the same predefined tree.
For example, the predefined tree can be used with other applications such as SumTotal and Data Warehouse. This will not impact other PeopleSoft trees used by Finance and IT.
Recommendations
- It is critical that all campuses create uniform trees using the four-level structure.
- Hierarchy trees need to be created and tested prior to the PageUp implementation
- Use the Business Process Guide: Creating a New Department Hierarchy Tree for Reporting and CHRS Recruiting document to set up and maintain Organizational Hierarchy Trees (see Appendix B).
Considerations
Initially building the tree may require a great deal of time for analysis and creation however, this is a one-time effort. Ongoing maintenance of the hierarchy tree will require that changes to the structure be made in a timely manner (e.g., adding a new department, organizational changes)
- Hierarchy Trees will be created and maintained in PeopleSoft. An integration will keep campus trees in sync between PeopleSoft and PageUp. Changes made to the tree will not be reflected in PageUp until the following day via a nightly process.
- It is a campus decision on who will build and maintain their Organizational Hierarchy Tree. The current practice of maintaining Department and Security trees will remain unchanged.
- PageUp supports no more than four levels. Each campus will need to build a tree that groups departments by function.
- The main purpose for these trees is for PageUp and will assist with reporting. All stakeholders must review and approve the structure to ensure that every department is accounted for.
Cross-Functional Impacts (Positive / Negative)
- Benefits Administration: N/A
- Labor Cost Distribution: N/A
- Workforce Administration: N/A
- Time & Labor: N/A
- Absence Management: N/A
- Temp Faculty: N/A
POSITIVE: The same hierarchy tree can be utilized by SumTotal, Data Warehouse, and specific queries that campuses run.
NEGATIVE: Organizational Hierarchy Trees must be created and maintained at the campus level which is a process that currently does not exist. This is required even when CHRS is operational (this is addressed in the Issues section.)
CHANGE IMPACT
To be filled out by BSA (from Change Impact Tracking log):
| Module | Map ID | Change Impact Log ID | Map Name | Impact Type | % of Employees Impact |
|---|---|---|---|---|---|
| N/A |
The following items will be answered / addressed by Change Management:
Areas of potential change resistance to proposed HR process / policy changes?
As mentioned in the ‘Considerations’ section, initially building the tree may require a great deal of time for analysis and creation, also, ongoing maintenance of the hierarchy tree will require that changes to the structure be made in a timely manner. This is not optional but campuses may resist due to the time and effort involved.
Potential resource needs in order to plan, engage, prepare, and/or deploy the change?
Each campus must designate a person in Human Resources that is responsible for the maintenance of the CHRS Tree, taking into consideration not only who will initially build the tree but who will continue to maintain it and incorporate all organizational changes going forward.
Associated costs relative to the scope of the change to requirements requested?
Staff time for new business process, training as needed.
Training needs or if a straightforward change?
Staff assigned to create and/or maintain trees within PeopleSoft must have a basic understanding of the system, knowledge of effective dating, and be familiar with navigating the system and adding, updating, and deleting information by using PeopleSoft windows, menus, and pages.
Implication on any other related process / functions?
Security for access to Tree Manager. Prevent HR staff from modifying other campus organizational trees and from viewing Department and Security trees.
Union impact?
No reasonably foreseeable impacts within the scope of bargaining identified at the time of review.
Appendix A: Creating a New Department Hierarchy Tree for Reporting and CHRS Recruiting
Last revised: 11/25/2019
Revision Control
Document Title: Creating a New Department Hierarchy Tree for CHRS Recruiting Solution
Author: CHRS Recruiting Integration Team
Table of Contents
2.1 Defining Levels
2.2 Defining Node Properties
2.3 Defining Tree Details
3.0 PeopleSoft Tree Manager Overview
3.1 Adding a New Tree
1.0 Introduction
As part of the Common Human Resources System (CHRS), the CSU has selected PageUp as our common recruiting solution. In CHRS Recruiting, the organizational hierarchy can be established for up to four levels (Campus, Division, College/Program and Department), and is used for reporting.
Below is an example of how this hierarchy is used in CHRS Recruiting:
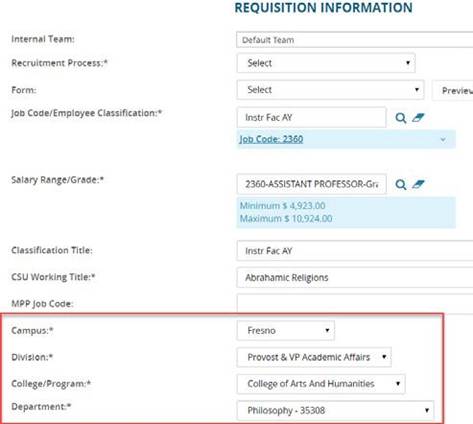
In order to fully utilize the functions within CHRS Recruiting, each campus will need to create a new department tree in the PeopleSoft HCM 9.0 system, mimic the above four levels. A nightly process will extract the position hierarchy data from this tree for the 23 campuses, plus the Chancellor’s Office, and combine the data in a text-friendly format to be loaded into the CHRS Recruiting system.
Assumption: These instructions are intended for the campus designated Tree manager and only point out requirements and suggestions for building a Department Tree Hierarchy for use for CHRS Recruiting.
These are NOT complete instructions for building trees in PeopleSoft. It is assumed that the user is familiar with building and maintaining trees already. Please refer to PeopleSoft tools for more detailed information on building trees.
It is also assumed that campuses have completed the hierarchy template in Excel prior to starting this exercise. It is the campus decision on who will build and maintain the Hierarchy tree going forward.
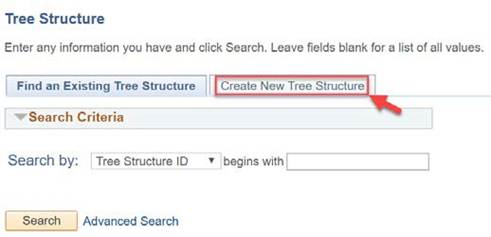
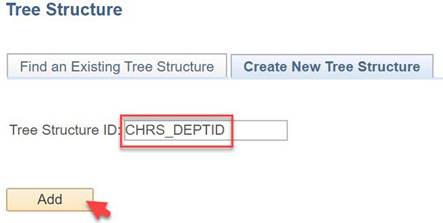
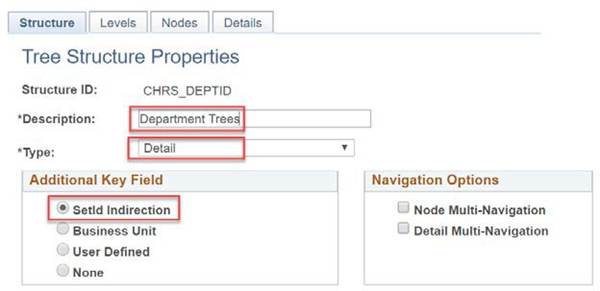
2.0 Create New Tree Structure
When you define a tree structure, you specify the pages and record definitions PeopleSoft Tree Manager uses to store data about the parts of a tree. The new Tree Structure value will be used when creating the new department tree.
| Screenshot | Steps |
|
|
|
|
|
|
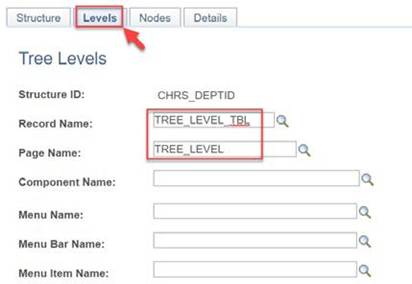
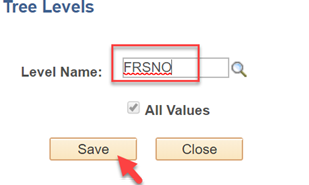
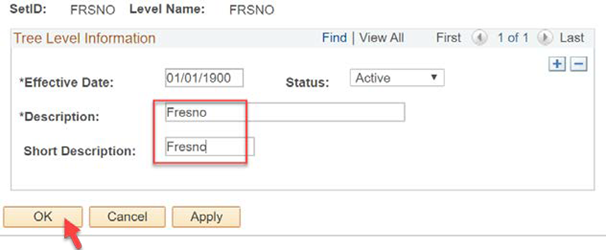
2.1 Defining Levels
Use the Tree Levels page to specify the page and record to enter and store information about tree levels.
| Screenshot | Steps |
|
|
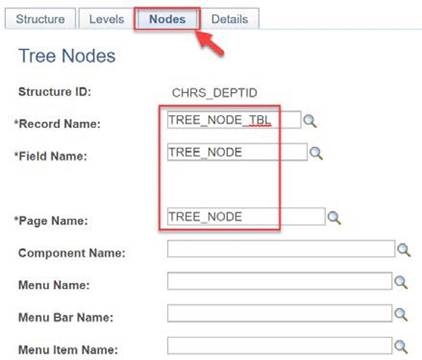
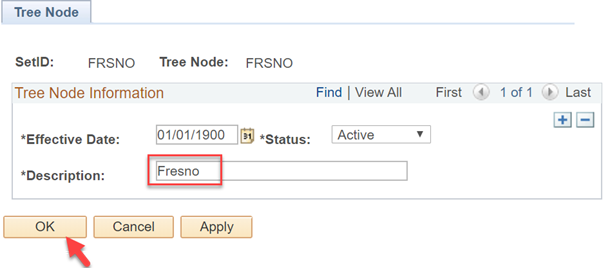
2.2 Defining Node Properties
Use the Tree Nodes page to specify the page and record to enter and store information about tree nodes.
| Screenshot | Steps |
|
|
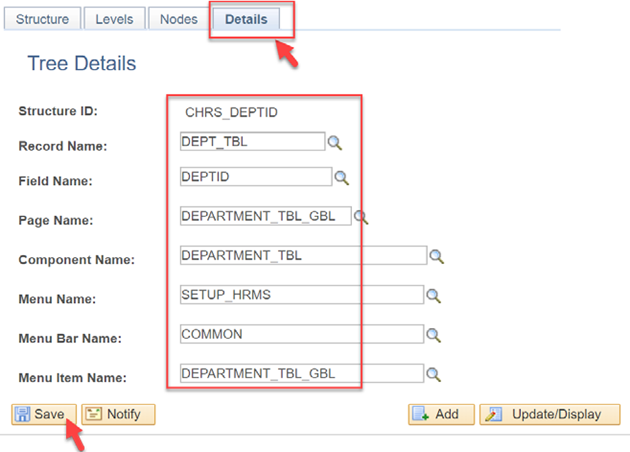
2.3 Defining Tree Details
Use the Tree Details page to define the application data and component used to maintain the detail values for your tree.
| Screenshot | Steps |
|
|
3.0 PeopleSoft Tree Manager Overview
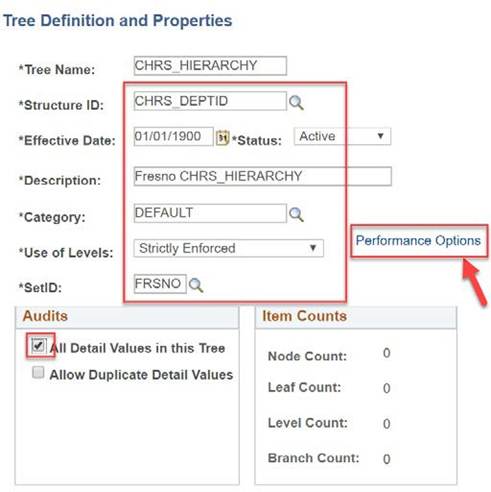
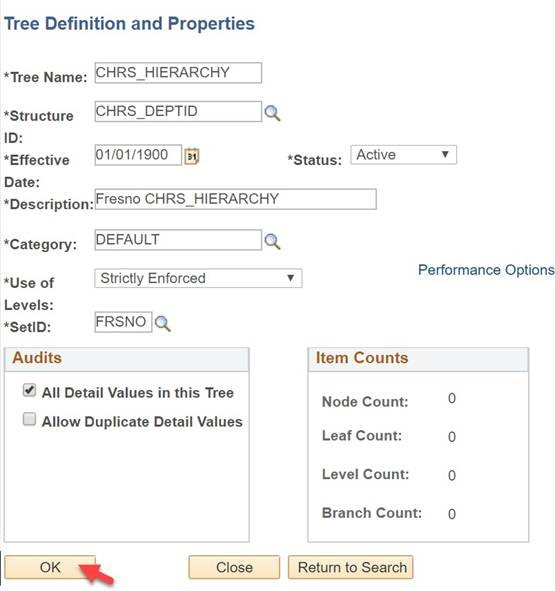
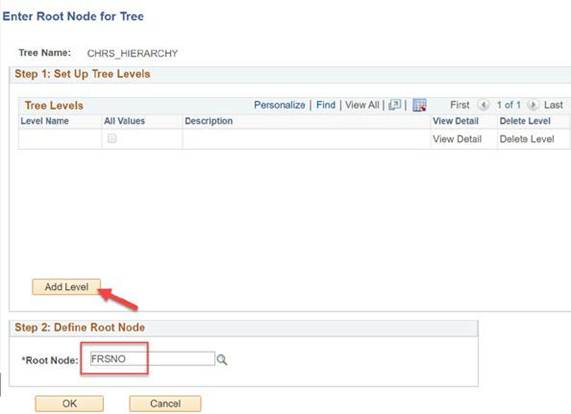
With PeopleSoft Tree Manager, you represent data graphically to show a hierarchy. You build a tree that mirrors the existing organizational hierarchy. For example, the values of the DEPTID field identify individual departments in your organization. You use PeopleSoft Tree Manager to define the organizational hierarchy that specifies how each department relates to the others. CHRS Recruiting supports up to four levels, therefore, each campus will need to build a tree that groups departments by function.
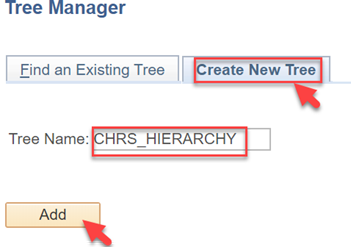
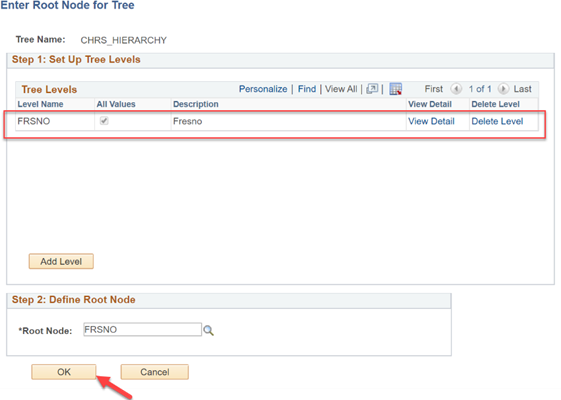
3.1 Adding a New Tree
| Screenshot | Steps |
|
|
|
Effective date of the Tree must match the effective date of the nodes. Campus can choose to maintain these effective dates to keep a record of history, or setup as static dates. |
|
|
|
|
|
|
|
|
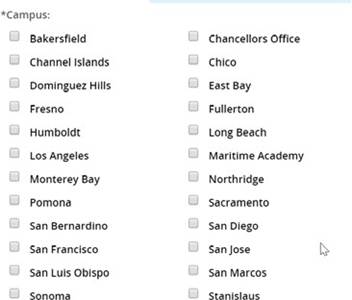
Campus Namesin CHRS Recruiting system:
|
|
|
|
|
|
|
|
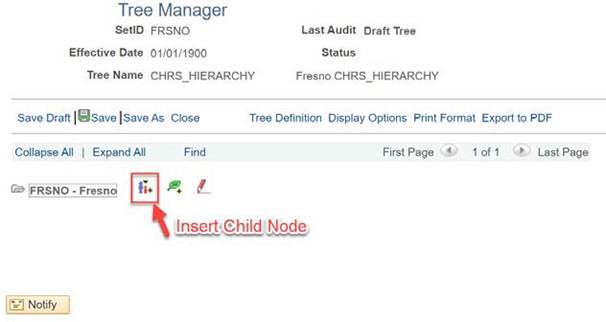
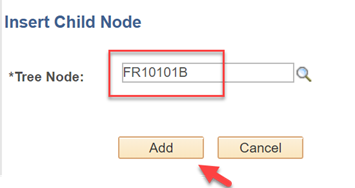
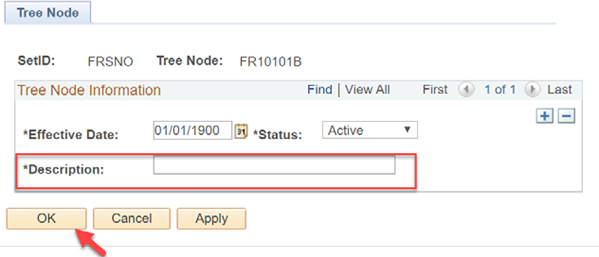
| When inserting a child node or a sibling node, a window will open for Tree Node name to be keyed. Clicking on “Add” will bring you to the Tree Node page to key the Description of the node. Please note that in CHRS Recruiting, the description field will be displayed, not the Tree Node field. So please make sure your description field makes sense for your end users. |
|
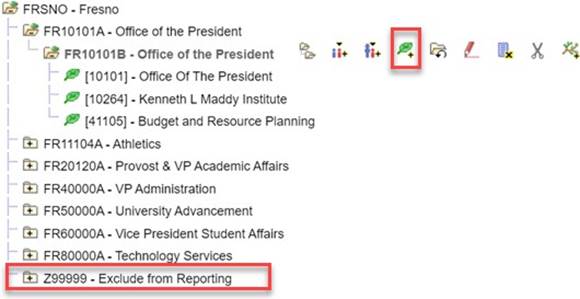
Note: The tree must maintain the four-level structure. All tree nodes must have at least one department value. CHRS Recruiting system does not accept blank values. |


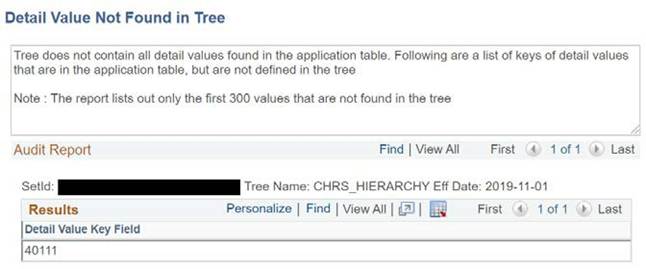
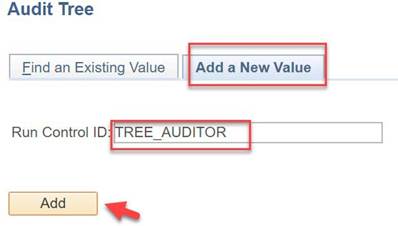
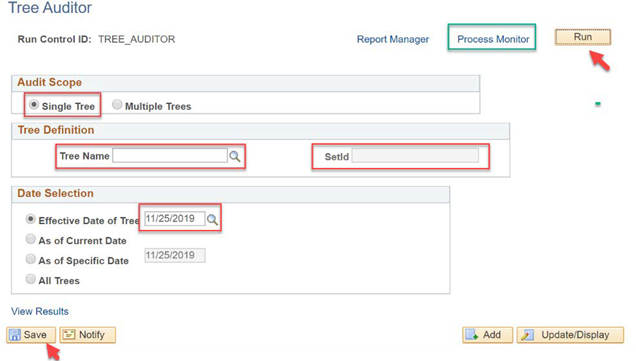
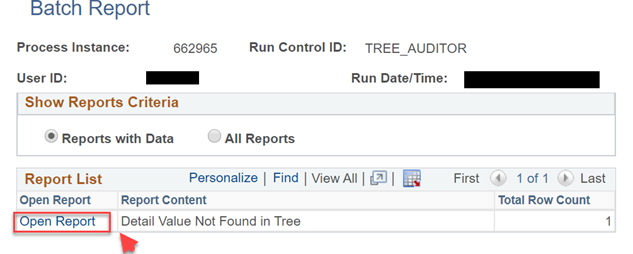
4.0 Run Tree Auditor
After you have completed your tree, you can have PeopleSoft Tree Manager verify that it meets the restrictions you set for it. For example, if you selected the All Detail Values in this Tree option when you created the tree definition, PeopleSoft Tree Manager Audit verifies that you have included all detail values. Below are the steps to help you identify missing department value on the tree.
Please Note: all departments must be in the tree, to get a clean audit – even if they are not currently in use by HR. These departments should be added to an “Exclude from Reporting” node on your CHRS_HIERARCHY tree. Anything reside under this node will not be extracted to export to CHRS Recruiting.
| Screenshot | Steps |
|
|
|
|
|
|
 |
|
5.0 Query with This Tree
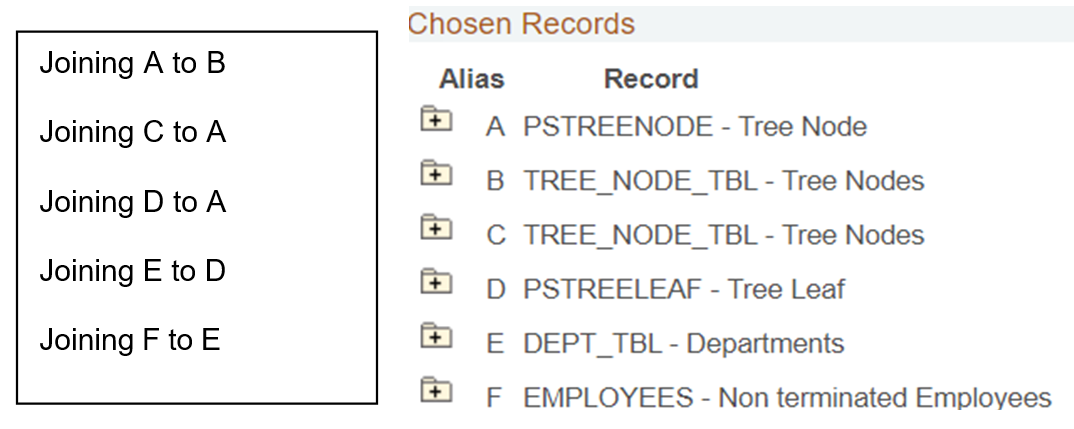
After you have completed your tree, you can build query using this tree to show department/college/division level of data. Here is an example of how to use the CHRS_HIERARCHY tree to build a query, pulling all M80 employees listed by their department, college/program and division.
Select the following records for this query. Joining the records in the following order:
- When joining the records, accept all default joining criteria
- Make a change in the criteria as highlighted in green below
- Add an extra criterion as highlighted in yellow below
| Logical | Expression1 | Condition Type | Expression 2 |
|
|---|---|---|---|---|
| A.EFFDT - Effective Date | Eff Date <= | Current Date |
|
| AND | A.TREE_NAME - Tree Name | equal to | CHRS_HIERARCHY |
|
| AND | A.SETID - SetID | equal to | B.SETID - SetID |
|
| AND | B.EFFDT - Effective Date | Eff Date <= | Current Date |
|
| AND | B.TREE_NODE - Tree Node | equal to | A.PARENT_NODE_NAME - Parent Node Name | Change |
| AND | A.SETID - SetID | equal to | C.SETID - SetID |
|
| AND | A.TREE_NODE - Tree Node | equal to | C.TREE_NODE - Tree Node |
|
| AND | C.EFFDT - Effective Date | Eff Date<= | Current Date |
|
| AND | A.SETID - SetID | equal to | D.SETID - SetID |
|
| AND | A.SETCNTRLVALUE - Set ControlValue | equal to | D.SETCNTRLVALUE - Set ControlValue |
|
| AND | A.TREE_NAME - Tree Name | equal to | D.TREE_NAME - Tree Name |
|
| AND | A.TREE_NODE_NUM - Tree NodeNumber | equal to | D.TREE_NODE_NUM - Tree NodeNumber |
|
| AND | A.TREE_BRANCH - Tree BranchName | equal to | D.TREE_BRANCH - Tree BranchName |
|
| AND | D.EFFDT - Effective Date | Eff Date<= | Current Date |
|
| AND | D.SETID - SetID | equal to | E.SETID - SetID |
|
| AND | E.EFFDT - Effective Date | Eff Date<= | Current Date |
|
| AND | E.DEPTID - Department | equalto | D.RANGE_FROM - Range From | Add |
| AND | E.DEPTID - Department | equal to | F.DEPTID - Department | |
| AND | F.EFFDT - Effective Date | Eff Date <= | Current Date(EffSeq = Last) |
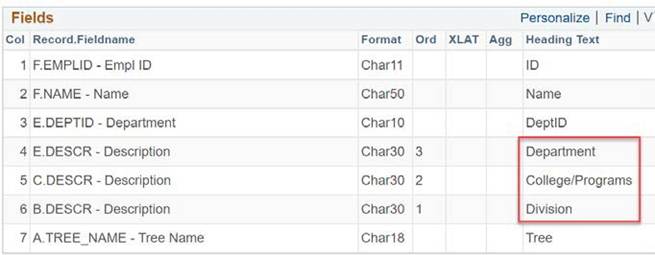
Select the following fields for the query. Change the heading text for highlighted fields to represent the correct hierarchy levels. See Additional Notes #2 for instructions on how to change heading text.
- When this query is saved and run, result will display

Additional Notes:
- Field mapping in sample query:
| Record in Query | Record Name | Fieldname | Data Displayed |
|---|---|---|---|
A | PSTREENODE | TREE_NAME - Tree Name | Tree |
B | TREE_NODE_TBL | DESCR - Description | Division |
C | TREE_NODE_TBL | DESCR - Description | College/Programs |
D | DEPT_TBL | DEPTID - Department | Department ID |
D | DEPT_TBL | DESCR - Description | Department Name |
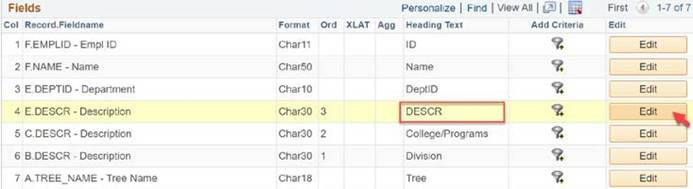
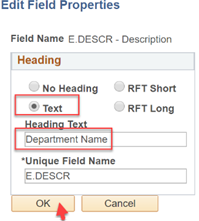
- Change Heading Text:
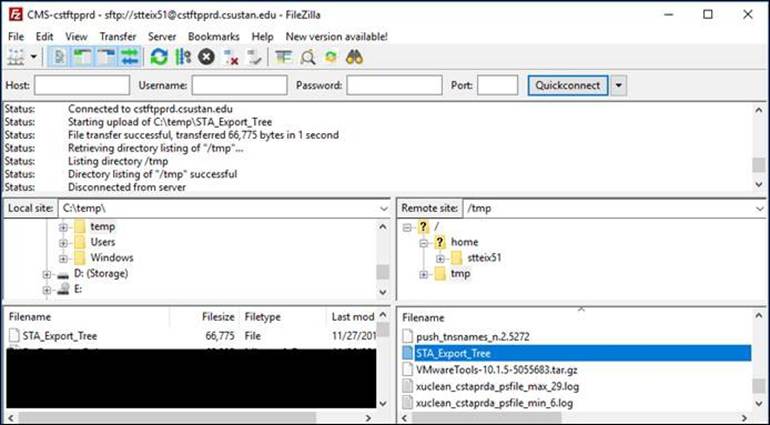
6.0 Export/Import the Tree
This section provides high-level steps on how to export a tree from one database and import it into another.
Assumptions: User has already created a final tree successfully and has access to these menus and pages in PeopleSoft. Recommend first test in a non-production database before importing to Production.
| Screenshot | Processing Steps |
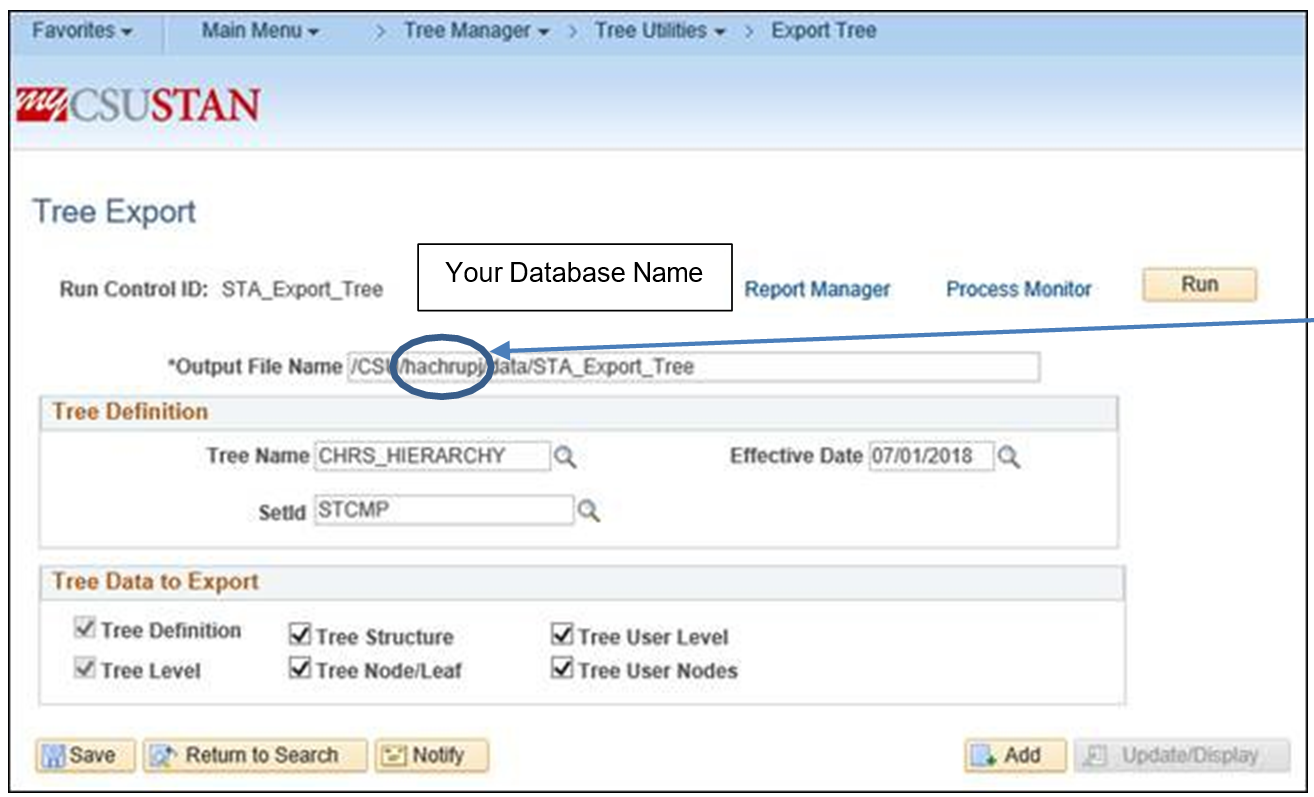
| Navigation Tree Manager > Export Tree
|
Step 3 and 4 are only required if the initial hierarchy tree is built in a CO development database, and you’re now transferring it back to a campus level database. Skip to Step 5 if you are export/importing the hierarchy tree within campus level databases and you have full access. | 3. Open a Service Now ticket and ask for the file to be attached to the ticket |
 |
|
 |
|
APPENDIX B: CHRS_HIERARCHY_AUDIT
Results show active position numbers with DEPTID either not in tree or in tree node = Z99999 or ZZ9999 to exclude from reporting.
--SQL to find all Positions/Departments that do not exist on the tree.
SELECT DISTINCT
A.POSITION_NBR, A.EFFDT, A.DEPTID, A.JOBCODE
FROM PS_POSITION_DATA A
WHERE
A.EFFDT =
(SELECT MAX(A1.EFFDT)
FROM PS_POSITION_DATA A1
WHERE
A.POSITION_NBR = A1.POSITION_NBR AND A1.EFFDT <= SYSDATE ) AND
A.EFF_STATUS = 'A' AND
NOT EXISTS
(SELECT DISTINCT 'X'
FROM PSTREELEAF B
WHERE
B.TREE_NAME = 'CHRS_HIERARCHY' AND B.EFFDT =
(SELECT MAX(B1.EFFDT)
FROM PSTREELEAF B1
WHERE
B1.SETID = B.SETID AND B1.TREE_NAME = B.TREE_NAME AND B1.EFFDT <= SYSDATE ) AND
A.DEPTID BETWEEN B.RANGE_FROM AND B.RANGE_TO AND B.TREE_NODE_NUM NOT IN
(SELECT DISTINCT D.TREE_NODE_NUM FROM PSTREENODE D
WHERE
D.SETID = B.SETID AND
D.TREE_NAME = B.TREE_NAME AND
D.EFFDT = B.EFFDT AND
D.TREE_NODE like 'Z%99%' ) )
order by
3, 1;
End of Article