
Background
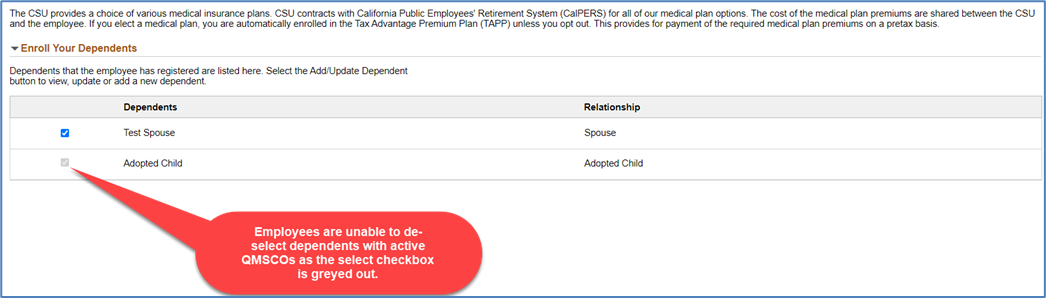
Court ordered dependent benefit plan coverage is also known as Qualified Medical Child Support Order (QMSCO). Employees must maintain coverage for applicable dependents in applicable benefit plans when ordered by the court. Benefit-eligible employees are not allowed to dis-enroll dependents from specific benefit coverage in v9.0 and CHRS when active QMSCOs are recorded in HR 9.0 and CHRS.
PeopleSoft provides delivered functionality to enforce benefit plan coverage for dependents with a QMSCO for benefit-eligible employees. In order to use this delivered functionality, the QMSCO must be entered and maintained for the dependent and applicable benefit plans on the Riders/Orders link in the Update Dependent/Beneficiary component.
Issue
The delivered PeopleSoft functionality to enforce benefit plan coverage for dependents with a QMSCO is not utilized consistently across all CSU campus for benefit-eligible employees. If this delivered functionality is not utilized in PeopleSoft, benefit-eligible employees will be able to dis-enroll dependents from specific benefit coverage in eBenefits Self Service, and campus Benefits Office staff will be able to dis-enroll dependents from specific benefit coverage in the On Demand Event Maintenance page and the Perform Election Entry page when active QMSCOs are in effect.
Analysis
See Issue section.
Recommendations
Enforce court-ordered coverage for dependents on specific benefits plans in HR 9.0 and CHRS using the delivered Riders/Orders functionality for benefit-eligible employees in PeopleSoft to prevent benefit eligible employees and Campus Benefits Office staff from dropping QMSCO dependent coverage on specific benefit plans in HR 9.0 and in CHRS. QMSCOs entered in HR 9.0 are converted into CHRS.
Example of QMSCO Coverage in Effect in CHRS eBenefits Self-Service
Example of QMSCO Coverage in Effect in CHRS On Demand Event Maintenance Page
Employees can change benefit plans with QMSCO dependents within a Plan Type for applicable BAS events via eBenefits Employees Self-Service, but they are not able to drop the QMSCO dependent(s) as long as the QMSCO is active and entered on the dependent record in PeopleSoft.
There are three ways to enter the actual court orders/riders for dependents into HR 9.0 and CHRS:
- Use the On Demand Event Maintenance component when you need to add the dependent(s) and QMSCO and then enroll the dependent into the applicable benefit plans.
- Use the Perform Election Entry component when you need to add the dependent(s) and QMSCO and then enroll the dependent into the applicable benefit plans, but you do not have access to the On Demand Event Maintenance component.
- Use the Update Dependent/Beneficiary component to enter, update or terminate the QMSCO when the impacted dependent(s) are already in PeopleSoft and are enrolled in the employee’s benefit plans.
Follow the applicable step-by-step instructions in this document to enter the QMSCOs in HR 9.0 and CHRS.
Use the SQL provided in this document to create a query to help manage the QMSCO population at your campus.
Considerations
When the QMSCO is received, the campus Benefits Office determines if the employee is a benefit-eligible employee. The benefit-employee’s campus Benefits Office contacts the employee and discusses benefits options to facilitate QMSCO enrollment by the court-ordered deadline. In CHRS, the campus that controls the employee’s benefits primary job is the campus responsible for contacting the employee, discussing benefits options to facilitate QMSCO enrollment by the court-ordered deadline, and entering the enrollments into CHRS.
If the benefit-eligible employee has opted out of benefit coverage when the QMSCO is received, how is it determined which plans to enroll the benefit-eligible employee and dependent(s)?
- If the benefit-eligible employee is eligible for health benefits and is not enrolled in any plans, the benefit-eligible employee and dependent are enrolled in applicable medical, dental and vision plans per the QMSCO order using the HBE BAS event in the On Demand Event Maintenance component. If the employee is enrolled in Medical Flex Cash and Dental Flex Cash and the employee must cover the dependents in medical and dental plans, the employee is dis-enrolled from Medical Flex Cash and Dental Flex Cash and instead enrolled into Medical and Dental plans.
- Medical: For coverage prior to 1/1/2022 use PERS Choice for Out of State dependents. Starting 1/1/2022, use PERS Platinum for Out of State dependents. Benefit plans for in-state dependents depends on the county residence location for the dependents. CalPERS assigns PERS Choice or PERS Platinum as a default. Assign PERS Choice prior to 1/1/2022 or PERS Platinum starting 1/1/2022 if the employee does not make a medical plan election by the QSMCO deadline.
- Dental: Use Delta Dental PPO for out of state dependents; benefit plans for in-state dependents depends on the county residence location for the dependents. Assign Delta Dental PPO as a default if the employee does not make an election by the QSMCO deadline.
- How is the benefit-eligible employee notified of the new QMSCO dependent benefit plan enrollments?
- The campus Benefits Office reaches out to the employee via email. CalPERS sends notifications via US Postal Service.
- How does the campus Benefits Office handle instances in which the employee ordered to cover a dependent is currently enrolled in their spouse’s CSU coverage?
- If the employee and spouse are both CSU employees, the dependents will be enrolled onto the spouse’s CSU coverage. If the benefit-eligible employee communicates to the Benefits Office prior to the QMSCO deadline, the employee can be dis-enrolled from the spouse’s plan, then the benefit-eligible employee and the dependent(s) are enrolled into the discussed plans or default plans listed above.
- QMSCO Management
- Create a query to list the employees with QMSCOs and to manage the QMSCO statuses for active and inactive employees.
Cross-Functional Impacts (Positive / Negative)
No impacts to other modules.
CHANGE IMPACT
To be filled out by BSA (from Change Impact Tracking log):
| Module | Map ID | Map Name | Impact Type | % of Employees Impact |
|---|---|---|---|---|
BN |
|
| >10% |
BSA – Please answer the following:
Areas of potential change resistance to proposed HR process / policy changes?
None identified.
Potential resource needs in order to plan, engage, prepare, and/or deploy the change?
Campus Benefits Office staff.
Associated costs relative to the scope of the change to requirements requested?
Employee time is the only cost.
Training needs or if a straightforward change?
Instructions are in this paper and are applicable to both HR 9.0 and CHRS.
Implication on any other related process / functions?
If this delivered functionality is not utilized in PeopleSoft, employees will be able to dis-enroll dependents from specific benefit coverage in eBenefits Self Service, and campus Benefits Office staff will be able to dis-enroll dependents from specific benefit coverage in the On Demand Event Maintenance page and the Perform Election Entry page when active QMSCOs are in effect.
Implication on any other related process / functions?
No reasonably foreseeable impacts within the scope of bargaining identified at the time of review.
Enter a QMSCO for a Dependent via Perform Election Entry
Use this process when you need to add the dependent(s) and enroll the dependent(s) into the applicable benefit plans, and if you do not have access to the On Demand Event Maintenance page.
The Perform Election Entry component is generally used by campus staff that do not have access to the On Demand Event Maintenance component to enter dependents and enter/update benefit elections into CHRS from paper enrollment forms.
The Perform Election Entry component use Benefits Administration System (BAS) events. The BAS event must have an Event Status of Open and a Process Status of Prepared, Notified or Re-enter with benefit plan options to perform dependent data entry, including court riders and court orders, and benefit plan data entry for the BAS event on the Perform Election Entry component.
Create or have someone in your office create an HBE BAS event to process this change via the Perform Election Entry page.
Navigation: Benefits> Manage Automated Enrollment > Participant Enrollment > Perform Election Entry
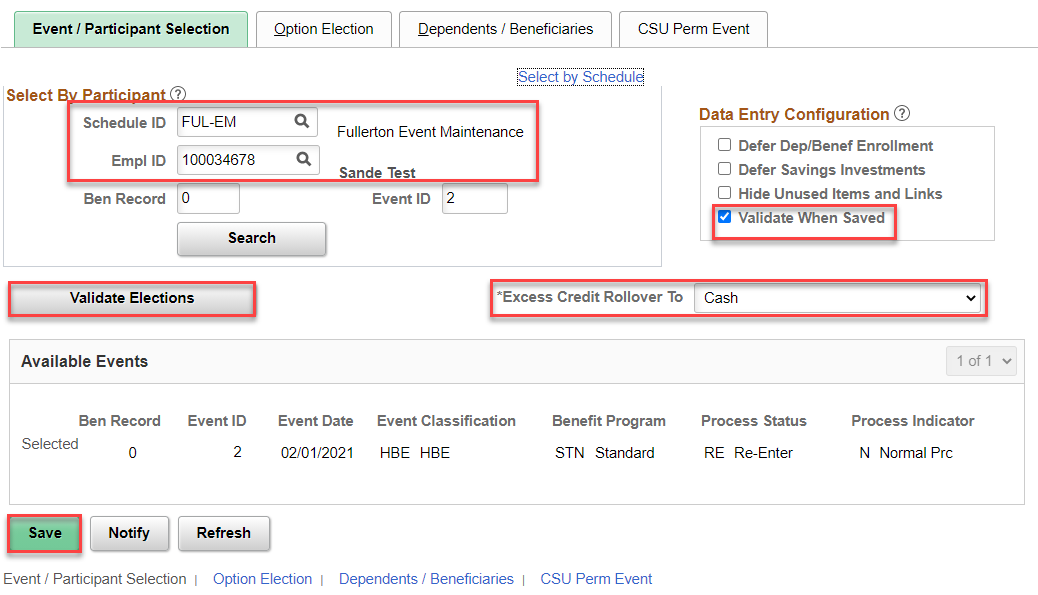
- Schedule ID – Enter the applicable Schedule ID. This is a required field.
- Empl ID – Enter the PeopleSoft employee ID. The employee must have an open BAS event in the Schedule ID with a Process Status of Prepared, Notified or Re-enter in order to enter or select the employee ID from the look up icon. This is a required field.
- Validate When Saved – This defaults as checked. Checked is considered a data entry time-saving feature where all field validations are checked when you save your entries.
- Validate Elections – Use this button to apply the Benefits Administration System module rules against the data entered. Error messages appear if the entry correction is needed.
- Excess Credit Rollover To – This feature is not used at this time in CHRS. Ignore this field.
- Save – Always save after data entry in the Perform Election Entry component.
- Enter the applicable Schedule ID.
- Enter the applicable Empl ID.
- Click on the Search button.
- Click on the Option Election tab.
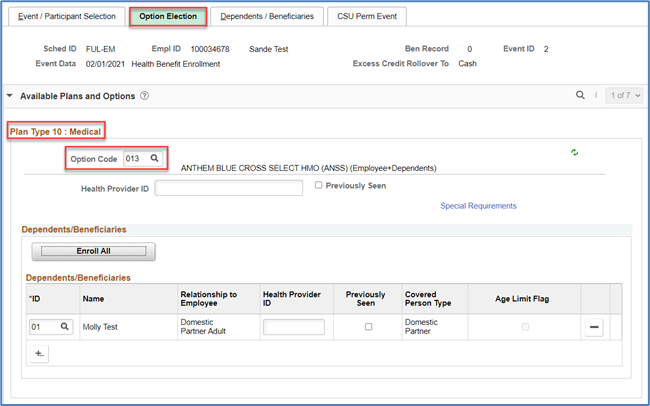
- Option Code - Verify the correct benefit plan and coverage level is selected. If not, update the Option Code.
Click on the Dependents / Beneficiaries tab, and then click on Change/Add Dependent Data.
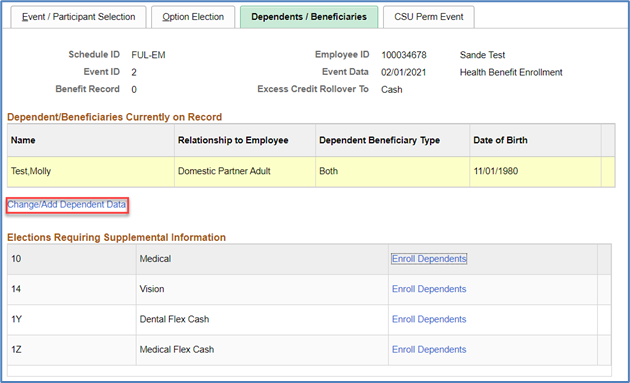
Locate the dependent(s). If the dependent(s) do not exist, add the dependent(s).
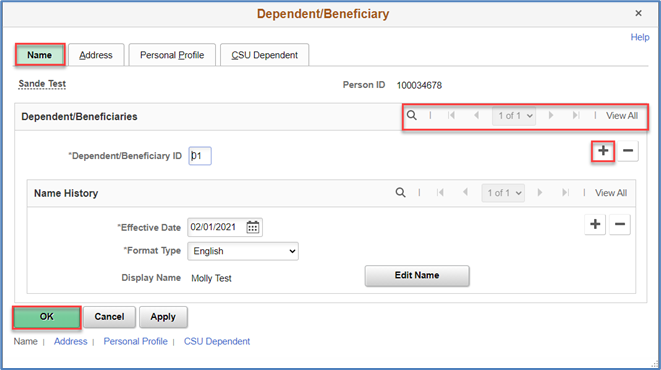
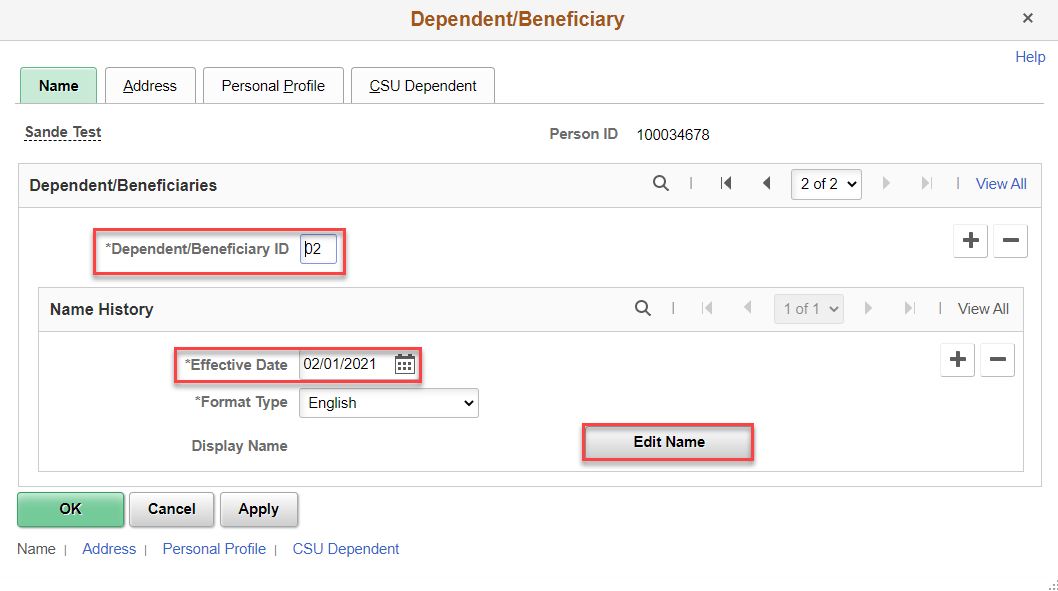
To add the dependent(s), click once for each dependent to add on the
 button in the Dependent/Beneficiaries section. A new blank effective-dated row appears and the Dependent/Beneficiary ID is automatically incremented by 1.
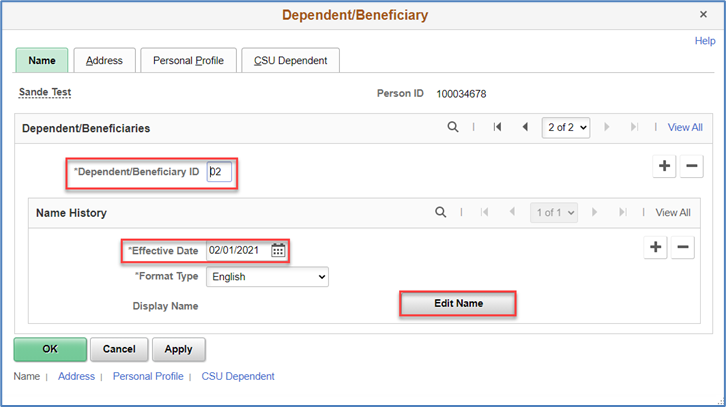
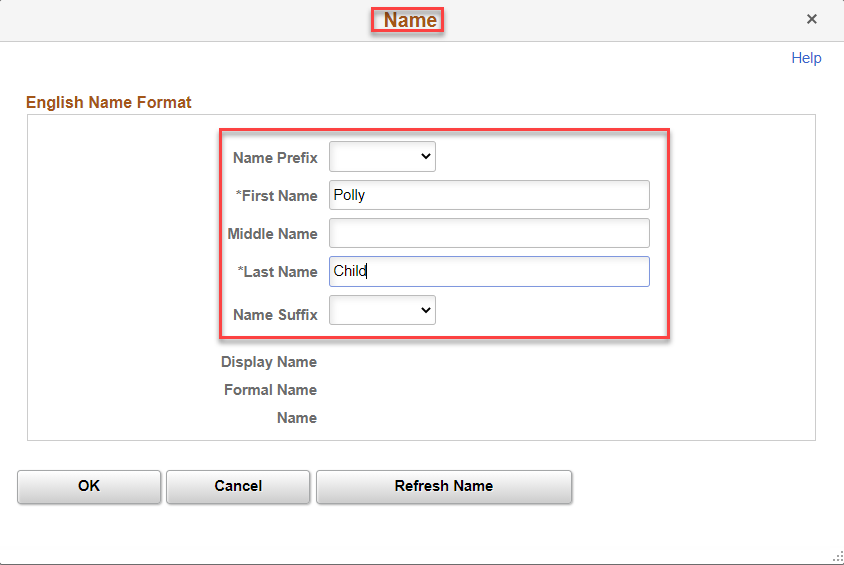
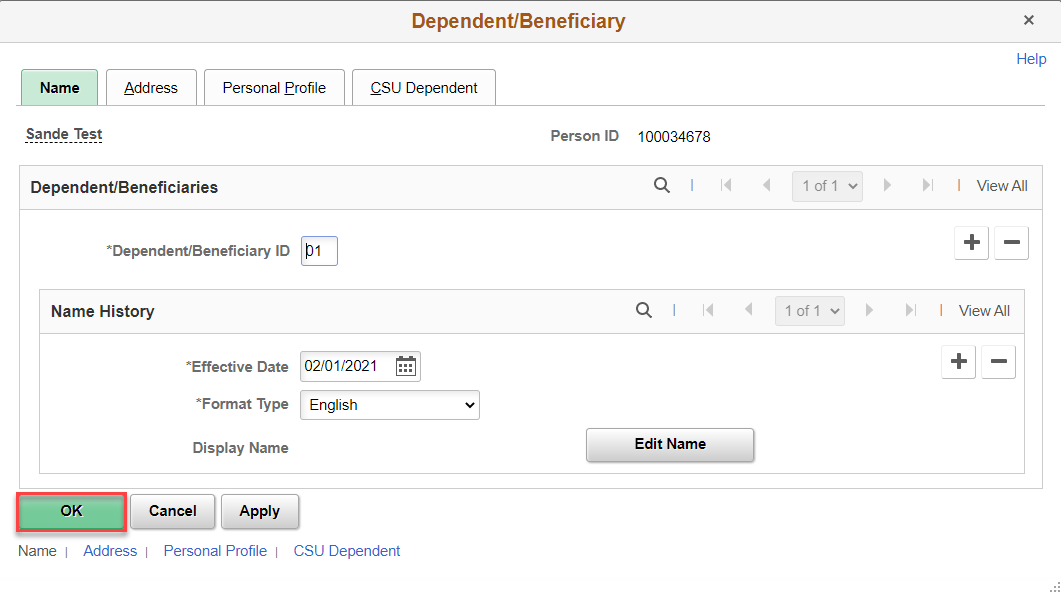
Click on Edit Name to enter the dependent’s name. The Name page appears.
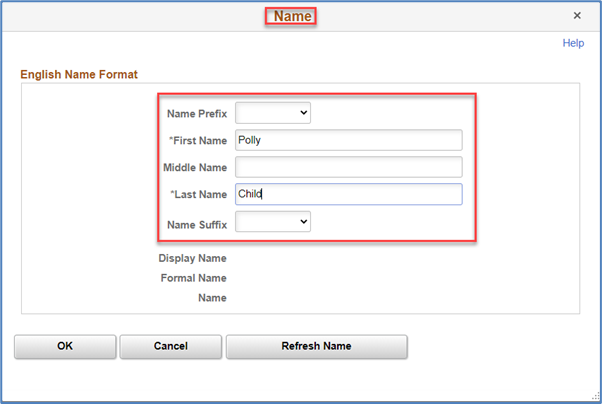
- First Name and Last Name are required fields. Enter the dependent’s name and then click on the OK button, and then click on the Address tab.
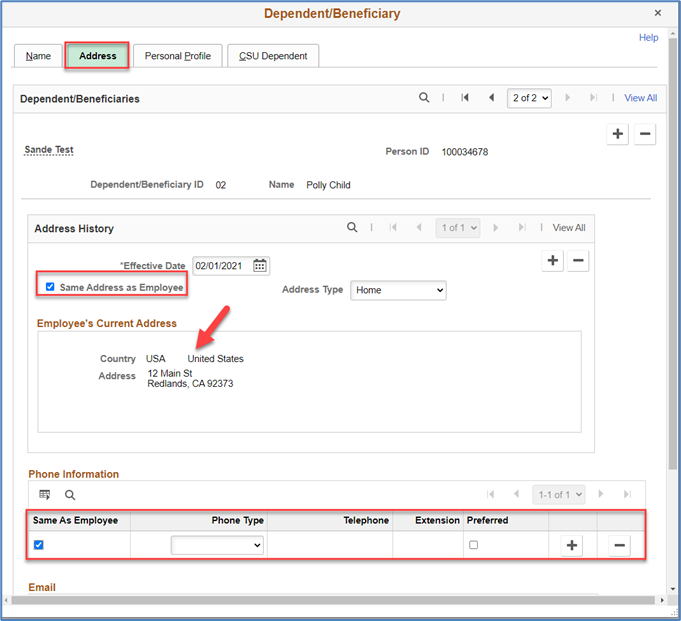
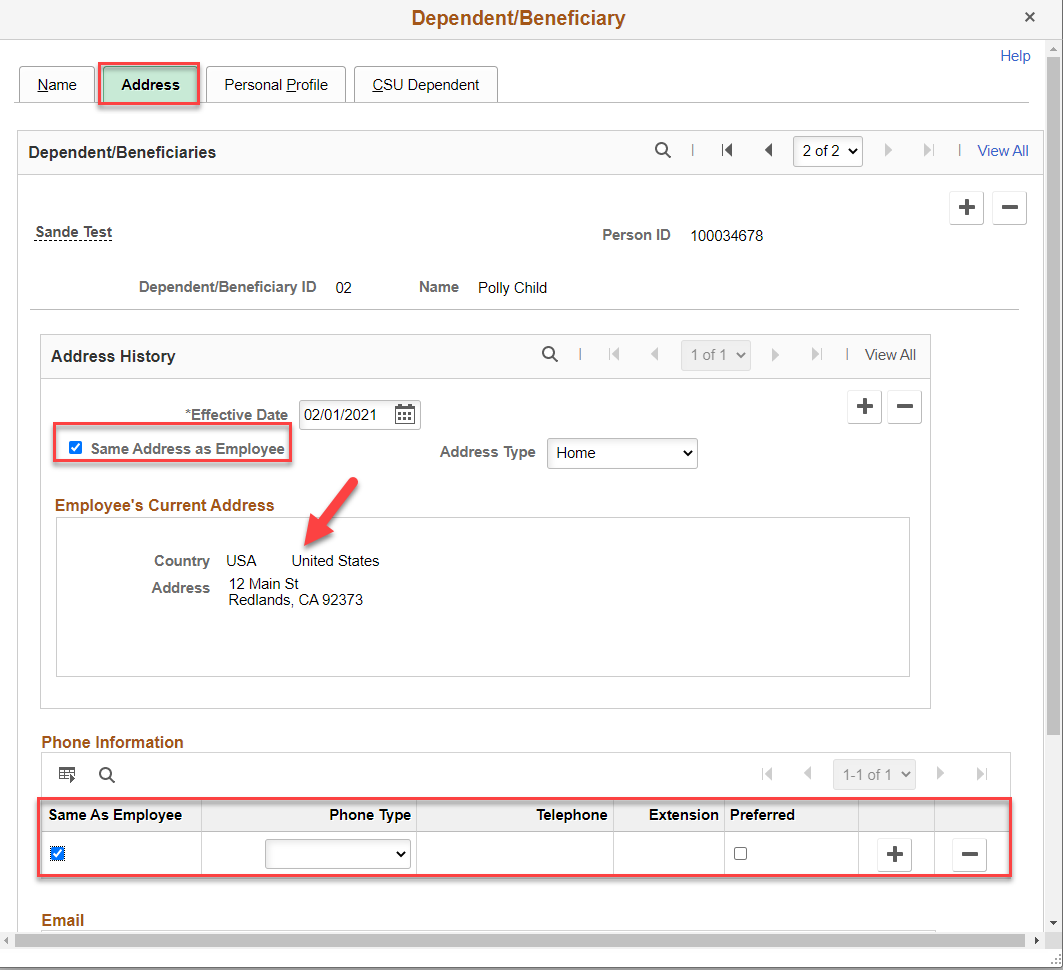
On the Address page, enter the dependent’s address. If the dependent’s address is the same as the employee, select on the Same Address as Employee checkbox. The employee’s address displays. If the dependent’s phone is the same as the employee, select the Same as Employee checkbox.
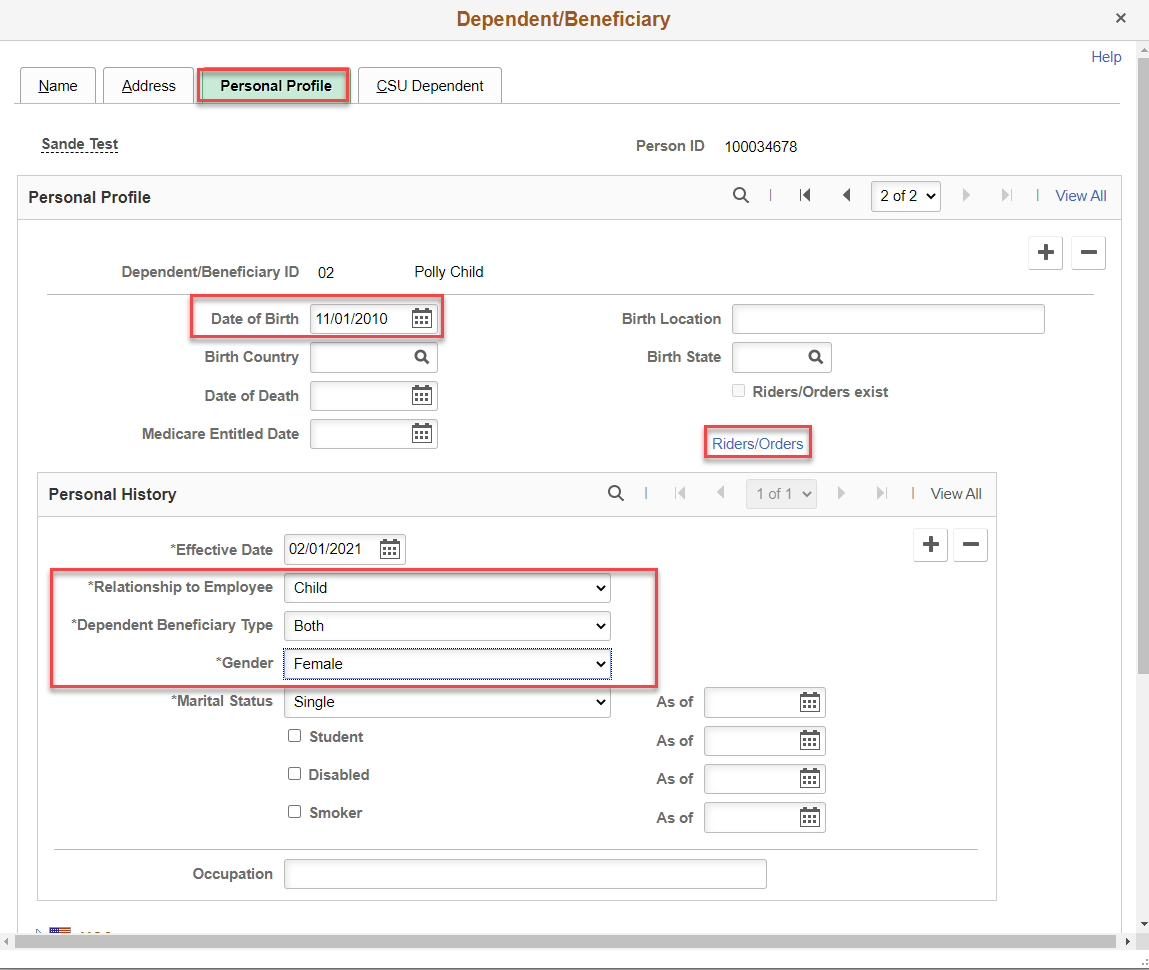
Click on the Personal Profile tab.
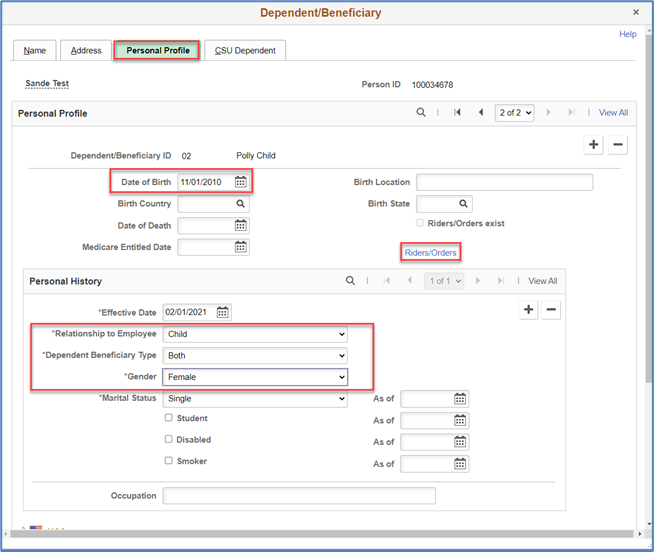
- Enter the dependent’s Date of Birth, Relationship to Employee, Gender and Marital Status. The Dependent/Beneficiary Type automatically populates based on the selected Relationship to Employee.
Note that the As of Date fields for Marital Status, Student and Disabled only appear on the initial dependent row. Be sure to enter the correct As of Date on the initial row. The Smoker and Smoker As of Date checkbox and field are not used in CHRS.
If you are updating the Relationship to Employee field for a dependent, click on the "+" button in the Personal History section to insert a new current row. If changing the Relationship to Employee from a Spouse or Domestic Partner to an ex-spouse or ex-domestic partner, make the change after you have removed the employee from benefit plans, and make the change effective-dated at least one day after the coverage change effective date so the correct Relationship to Employee value prints on the Medical enrollment form. Note that means that, for the dependent, you will not have the correct Marital Status Effective Date for the marital status change, but you will have this information on the employee’s Marital Status in the Modify a Person page.
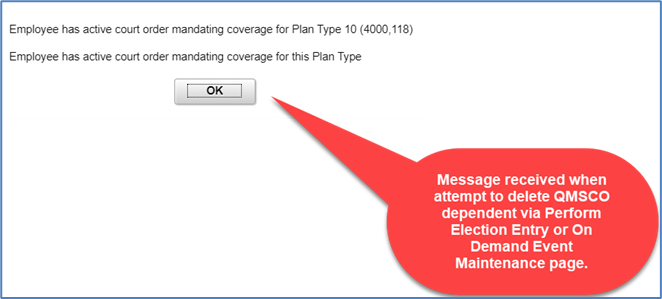
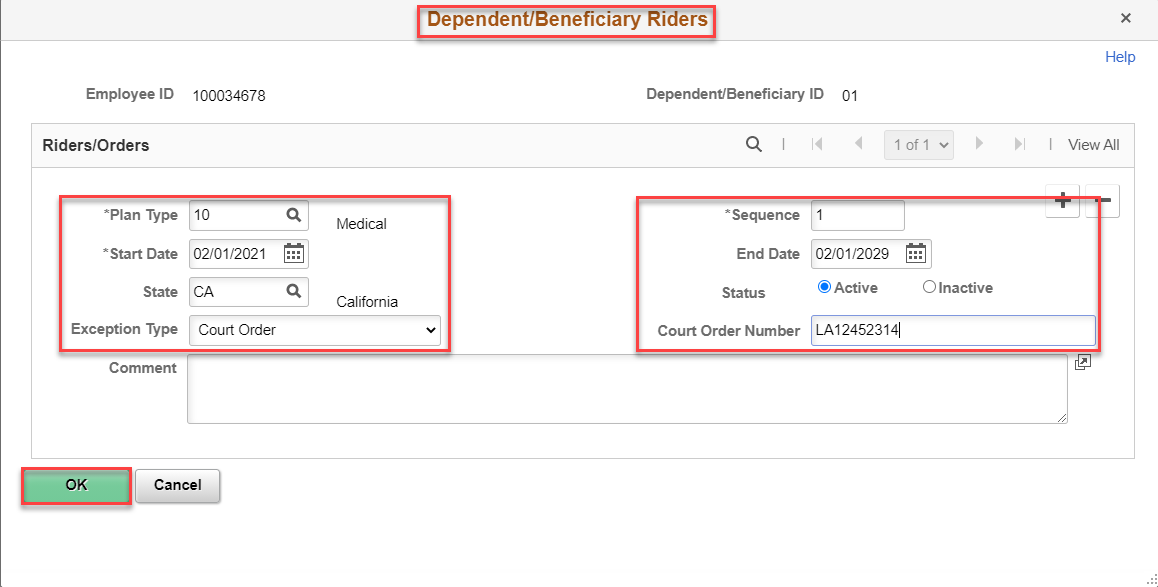
- Click on the Rider/Orders link to enter court orders for required benefit plan coverage, such as QMCSOs. While dependent Riders/Orders are in effective, employees via eBenefits Employee Self-Service are not able to remove (drop) the dependent from the applicable benefit plan(s) coverage in PeopleSoft. Campus Benefits Staff receive a warning message when they attempt to drop covered dependents with QMSCO orders via the On Demand Event Maintenance page.

Enter a Riders/Orders row for each plan type where the orders apply. Notice in the example screen shot that the row is for Plan Type 10, Medical. If the order also applies to Dental and Vision, enter a Riders/Orders row for Plan Type 11, Dental, and Plan Type 14, Vision. Enter a Riders/Orders row for each plan type where the orders apply. Notice in the example screen shot that the row is for Plan Type 10, Medical. If the order also applies to Dental and Vision, enter a Riders/Orders row for Plan Type 11, Dental, and Plan Type 14, Vision. Use the ‘+’ button to add additional rows for required plan types.
- Plan Type – Click on the Look up Icon and select the applicable plan type.
- Sequence Number – Start this number at 1 on the first row entered, then increase the number by ‘1’ for each subsequent row entered.
- Start Date – Enter the court order/rider start date.
- End Date – Enter the court order/rider end date. This is an optional field but do enter the data.
- State – Enter the state for the court that issued the order/rider.
- Status – Select the applicable court order status.
- Exception Type – Click the drop down list to select the applicable court order type.
- Court Order Number – Enter the court order/rider number.
- Comment – You have 254 characters to enter applicable comments. Make sure the comments are objective, not subjective.
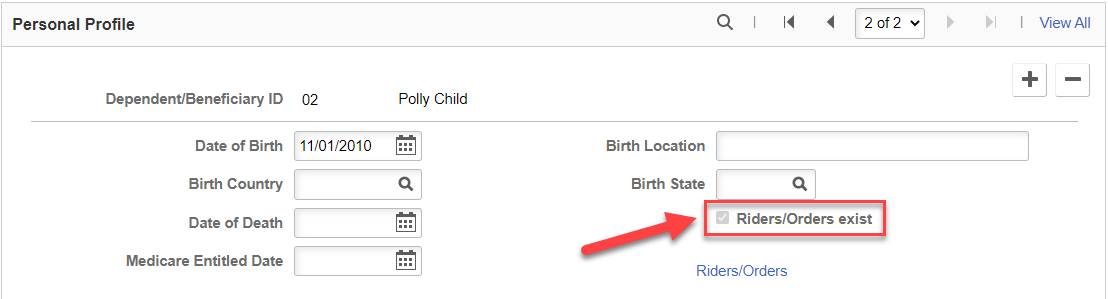
Click OK to save the court order/rider information. Repeat these steps for each plan type that requires a court order/rider row for the dependent. Note, that a checkmark appears in the Riders/Orders exists checkbox to denote that the dependent has riders/orders on record.

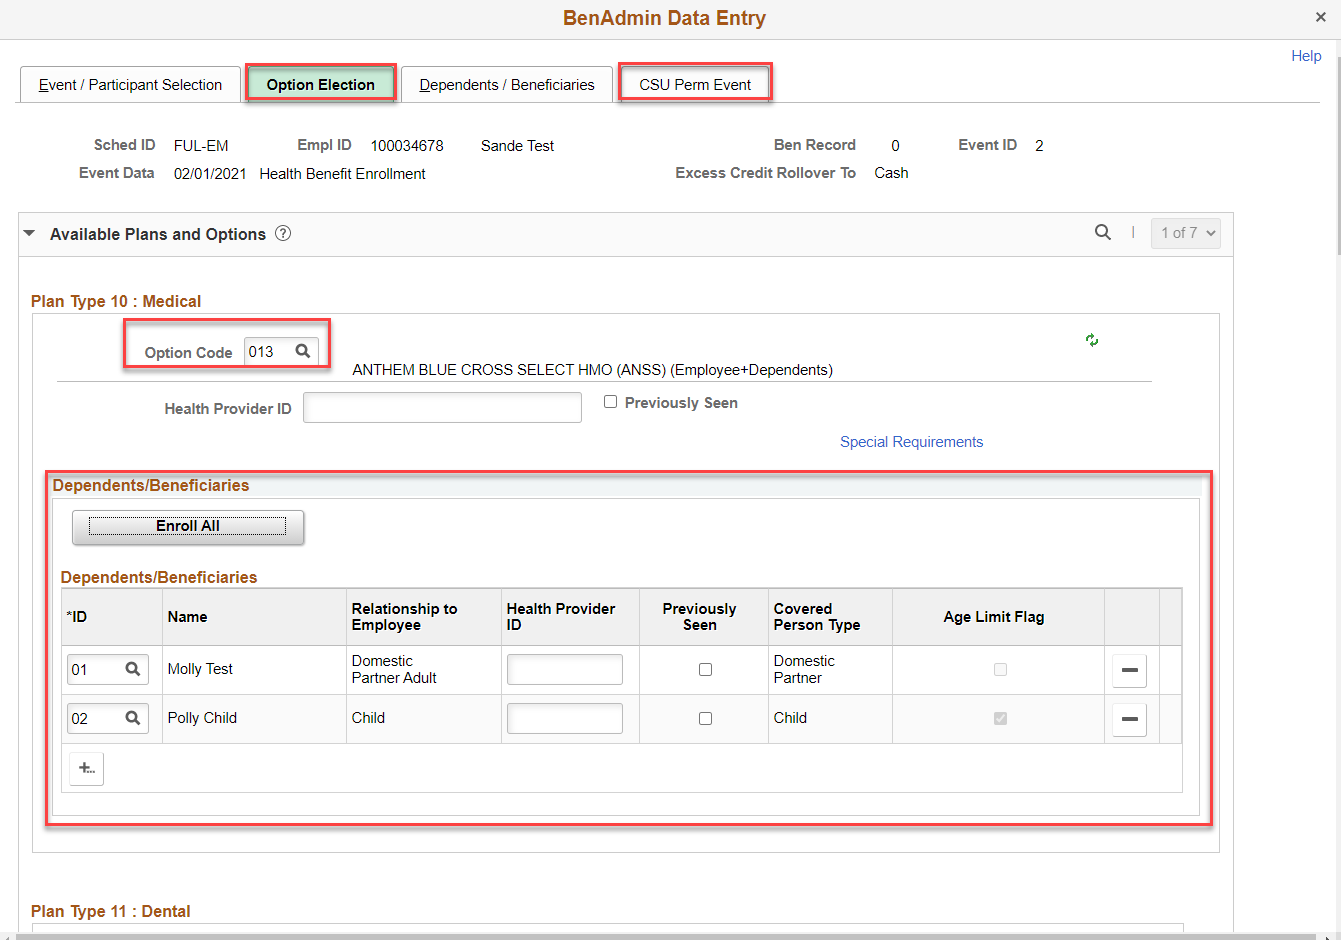
Click on the Option Election tab to add the dependent to the applicable benefit plans. You can click Enroll All and remove non-applicable dependents, or individually add the dependent. Complete the enrollment by entering the applicable permitting event code on the CSU Perm Event tab, then finalizing the enrollment. If applicable, be sure that you had dis-enrolled the employee from Medical Flex Cash and/or Dental Flex Cash benefit plans.
Enter a QMSCO for a Dependent via On Demand Event Maintenance
Use this process when you need to add the dependent(s) and also enroll the dependent(s) to the applicable benefit plans.
First, create an HBE BAS event in the Review BAS Activity page. If needed, refer to the CHRS Benefits Explanation of Review of BAS Activity Business Process Guide. Once the HBE BAS event has been created and saved in the Review BAS Activity page, go to the On Demand Event Maintenance page to add the dependent(s) and process the enrollment(s).
Navigation: Benefits> Manage Automated Enrollment > Events > On Demand Event Maintenance
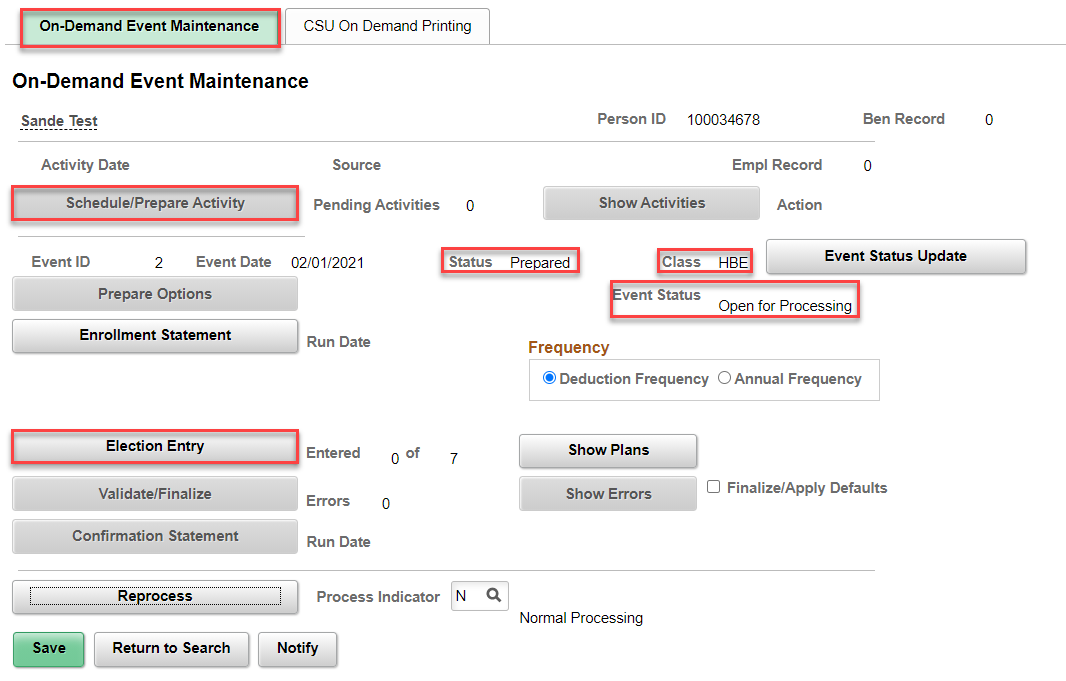
- Schedule/Prepare Activity – Click this button if needed to schedule and prepare the HBE BAS event for use.
- Election Entry – Click this button once the Process Status is Prepared or Re-enter to add the dependent(s) and then to enroll the dependents into the applicable benefit plans.
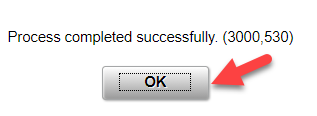
- Click on the Schedule/Prepare Activity button to prepare the HBE BAS event, then click on OK in the Process Successfully Completed message box.
- Click on the Election Entry button. The Ben Admin Data Entry window appears.
- Click on the Option Election tab.

- Verify the correct benefit plan and coverage level is selected for the Option Code of applicable benefit plans.
- Click on the Dependents / Beneficiaries tab, and then click on Change/Add Dependent Data link.
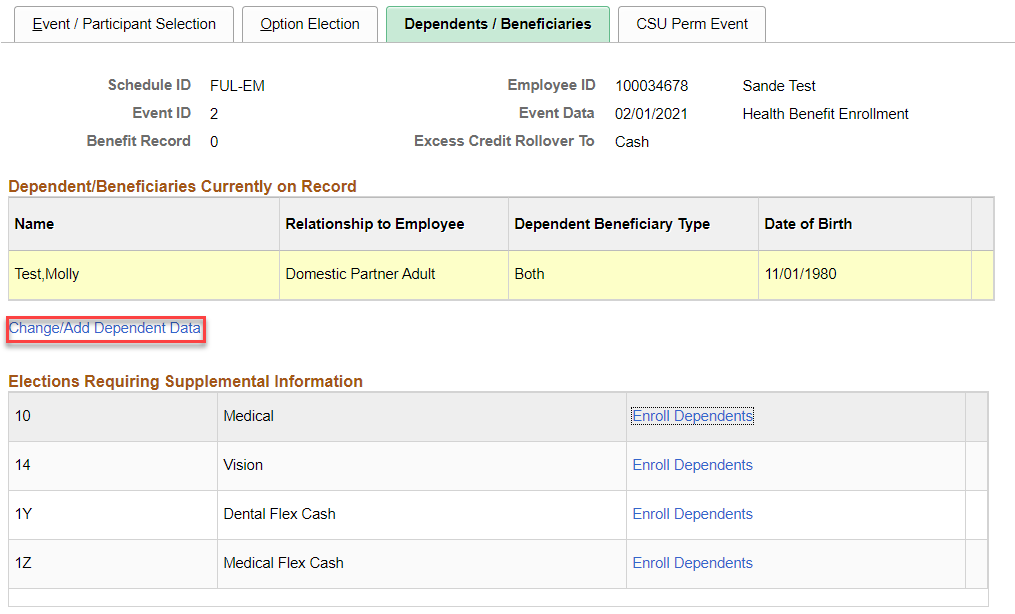
- Locate the dependent(s). If the dependent(s) do not exist, add the dependent(s).
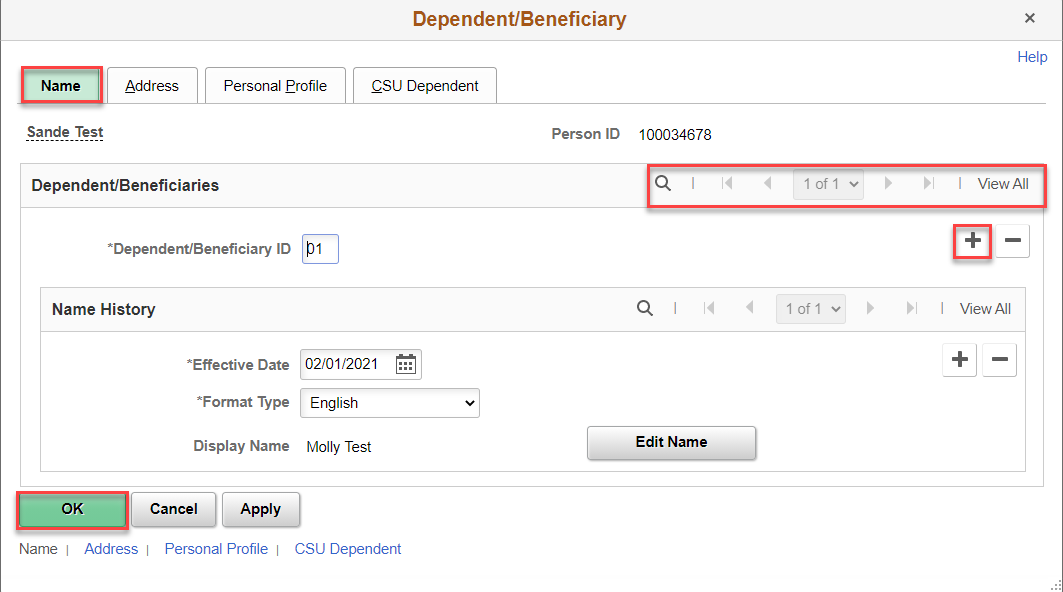
- To add the dependent(s), click once for each dependent to add on the '+' button in the Dependent/Beneficiaries section. A new blank effective-dated row appears and the Dependent/Beneficiary ID is automatically incremented by 1.
- Click Edit Name to enter the dependent’s name. The Name page appears.
- Enter the dependent’s First Name and Last Name. Click OK, and then select the Address tab.
- On the Address page, enter the dependent’s address. If the dependent’s address is the same as the employee, select on the Same Address as Employee checkbox. The employee’s address displays. If the dependent’s phone is the same as the employee, select the Same as Employee checkbox.
- Click on the Personal Profile tab.
- Enter the dependent’s Date of Birth, Relationship to Employee, Gender and Marital Status. The Dependent/Beneficiary Type automatically populates based on the selected Relationship to Employee.
- Note that the As of Date fields for Marital Status, Student and Disabled only appear on the initial dependent row. Be sure to enter the correct As of Date on the initial row. The Smoker and Smoker As of Date checkbox and field are not used in CHRS.
- If you are updating the Relationship to Employee field for a dependent, click on the '+' button in the Personal History section to insert a new current row. If changing the Relationship to Employee from a Spouse or Domestic Partner to an ex-spouse or ex-domestic partner, make the change after you have removed the employee from benefit plans, and make the change effective-dated at least one day after the coverage change effective date so the correct Relationship to Employee value prints on the Medical enrollment form. Note that means that, for the dependent, you will not have the correct Marital Status Effective Date for the marital status change, but you will have this information on the employee’s Marital Status in the Modify a Person page.
- Click on the Rider/Orders link to enter court orders for required benefit plan coverage, such as QMCSOs. While dependent Riders/Orders are in effective, employees via eBenefits Employee Self-Service are not able to remove (drop) the dependent from the applicable benefit plan(s) coverage in PeopleSoft. Campus Benefits Staff receive a warning message when they attempt to drop covered dependents with QMSCO orders via the On Demand Event Maintenance page.
- Enter a Riders/Orders row for each plan type where the orders apply. Notice in the example screen shot that the row is for Plan Type 10, Medical. If the order also applies to Dental and Vision, also insert a Riders/Orders row for Plan Type 11, Dental, and Plan Type 14, Vision. Enter a Riders/Orders row for each plan type where the orders apply. Notice in the example screen shot that the row is for Plan Type 10, Medical. If the order also applies to Dental and Vision, enter a Riders/Orders row for Plan Type 11, Dental, and Plan Type 14, Vision. Use the ‘+’ button to add additional rows for required plan types.
- Plan Type – Click on the Look up Icon and select the applicable plan type.
- Sequence Number – Start this number at 1 on the first row entered, then increase the number by ‘1’ for each subsequent row entered.
- Start Date – Enter the court order/rider start date.
- End Date – Enter the court order/rider end date. This is an optional field but do enter the data.
- State – Enter the state for the court that issued the order/rider.
- Status – Select the applicable court order status.
- Exception Type – Click the drop down list to select the applicable court order type.
- Court Order Number – Enter the court order/rider number.
- Comment – You have 254 characters to enter applicable comments. Make sure the comments are objective, not subjective.
Click OK to save the court order/rider information. Repeat these steps for each plan type that requires a court order/rider row for the dependent. Note that a checkmark appears in the Riders/Orders exists checkbox to denote that the dependent has riders/orders on record.

Click OK to save the entered dependent data.
Click on the Option Election tab to add the dependent to the applicable benefit plans. You can click Enroll All and remove non-applicable dependents, or individually add the dependent. Complete the enrollment by entering the applicable permitting event code on the CSU Perm Event tab, then finalizing the enrollment. If applicable, be sure that you had dis-enrolled the employee from Medical Flex Cash and/or Dental Flex Cash benefit plans.

Query to Manage QMSCOs
In HR 9.0 and CHRS, use this SQL to create a query to manage QMSCOs at your campus. This query prompts by Business Unit and lists employees who have dependents with court orders/riders (QMSCOs).
SELECT A.EMPLID, A.EMPL_RCD, TO_CHAR(A.EFFDT,'YYYY-MM-DD'), A.EMPL_STATUS, A.COMPANY, B.DEPENDENT_BENEF, B.PLAN_TYPE, TO_CHAR(B.START_DT,'YYYY-MM-DD'), B.EFFSEQ, B.EFF_STATUS, TO_CHAR(B.END_DT,'YYYY-MM-DD'), B.STATE, B.BEN_COURT_ORDR_NUM, B.COMMENTS, B.RIDER_TYPE
FROM PS_JOB A, PS_EMPLMT_SRCH_QRY A1, PS_DEPBEN_RIDER B, PS_PERS_SRCH_QRY B1
WHERE ( A.EMPLID = A1.EMPLID
AND A.EMPL_RCD = A1.EMPL_RCD
AND A1.OPRID = 'Your Operator ID will be inserted here'
AND B.EMPLID = B1.EMPLID
AND B1.OPRID = 'SMEITH'
AND ( A.BUSINESS_UNIT = :1
AND B.EMPLID = A.EMPLID )).
End of Article